La raccolta lead consente al tuo chatbot di acquisire i dati di contatto dei visitatori - nome, email e numero di telefono - permettendoti di ricontattare i potenziali clienti. Ogni contatto acquisito viene salvato nella scheda Leads (Lead) del tuo bot e, facoltativamente, puoi ricevere un'email ogni volta che arriva un nuovo lead.
Se non hai ancora creato un chatbot, consulta prima la guida su come creare il tuo primo chatbot.
Dove trovare le impostazioni di raccolta lead
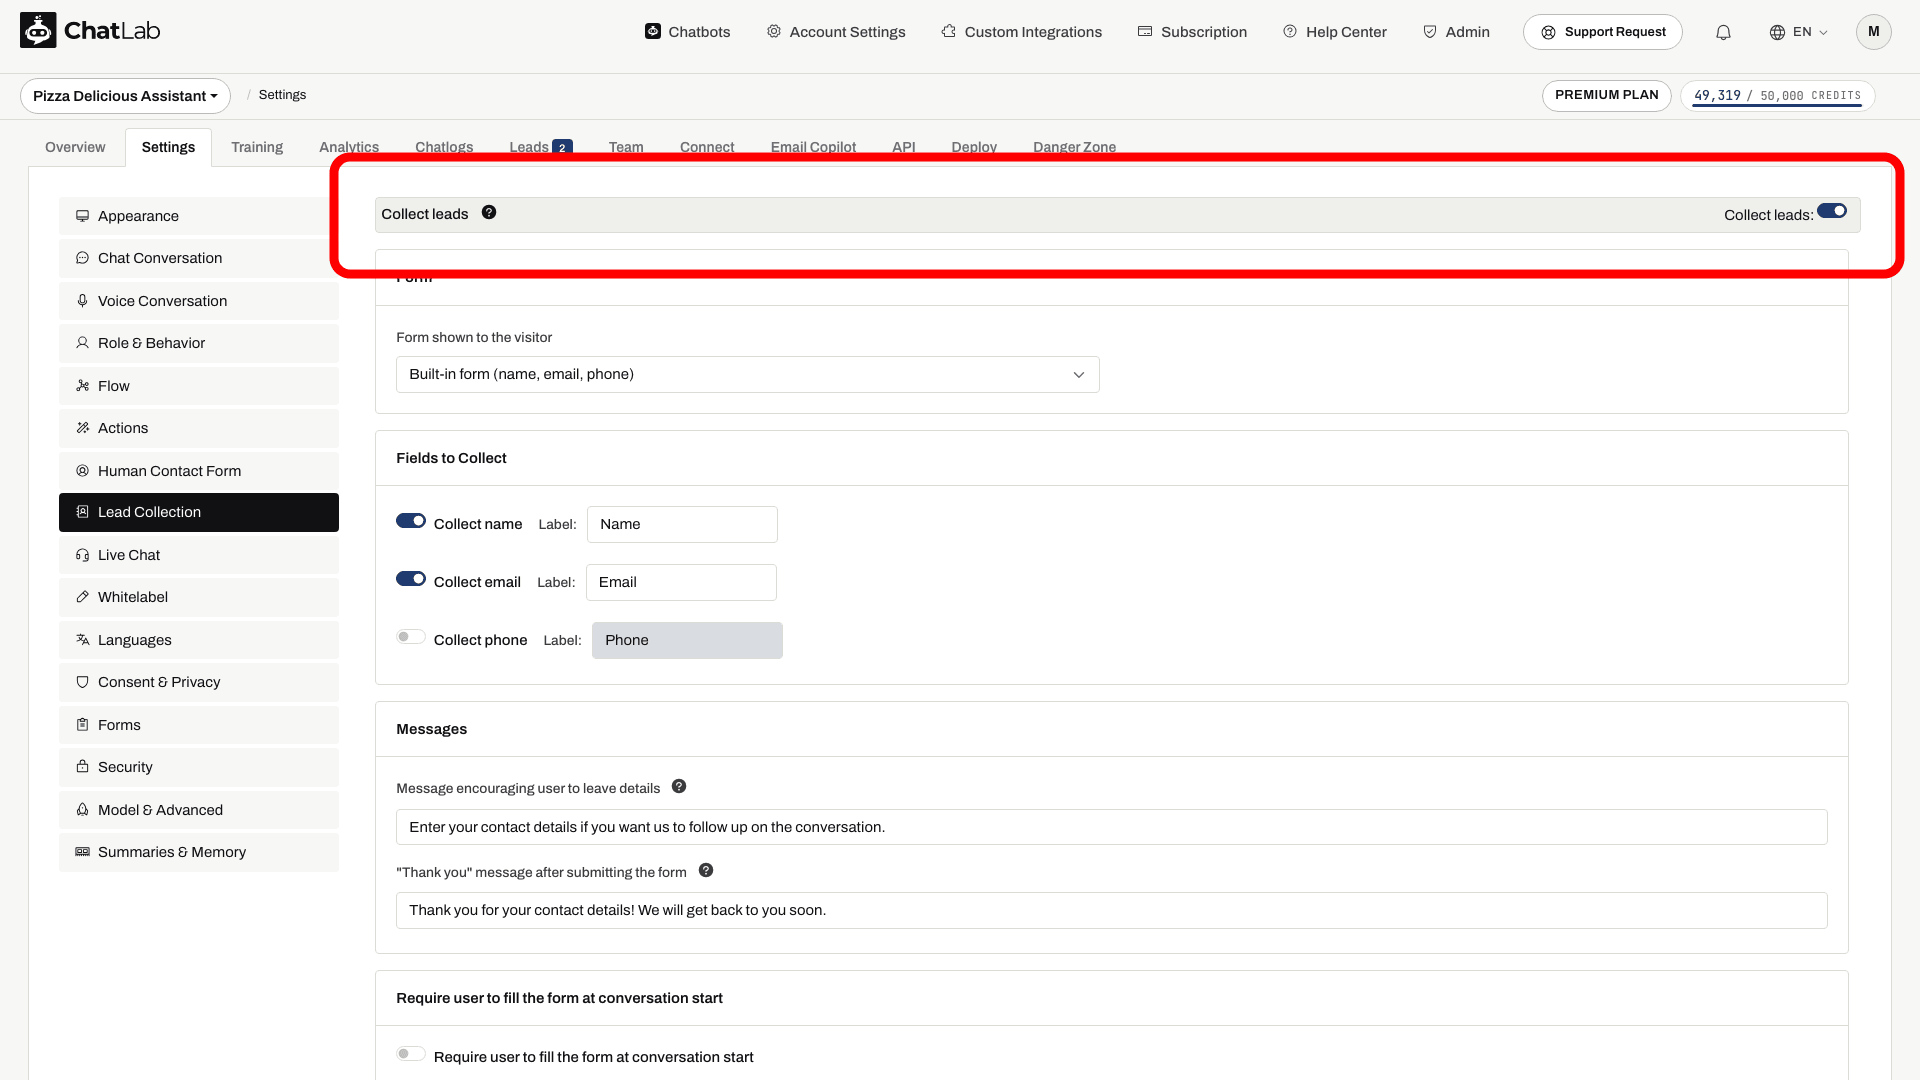
Seleziona il tuo chatbot, fai clic sulla scheda Settings (Impostazioni), quindi seleziona Lead Collection (Raccolta lead) nella barra laterale sinistra.
Abilitare la raccolta lead
Attiva l'opzione Collect leads (Raccogli lead) nella parte superiore della pagina. Una volta abilitata, compariranno le sezioni di configurazione sottostanti. Le modifiche apportate in questa pagina vengono salvate automaticamente - dopo ogni modifica compare l'indicatore "Saved" nell'intestazione.
Modulo mostrato al visitatore
La scheda Form (Modulo) nella parte superiore delle impostazioni determina quale modulo viene mostrato ai visitatori dal chatbot. Apri il menu a discesa Form shown to the visitor (Modulo mostrato al visitatore) per scegliere tra:
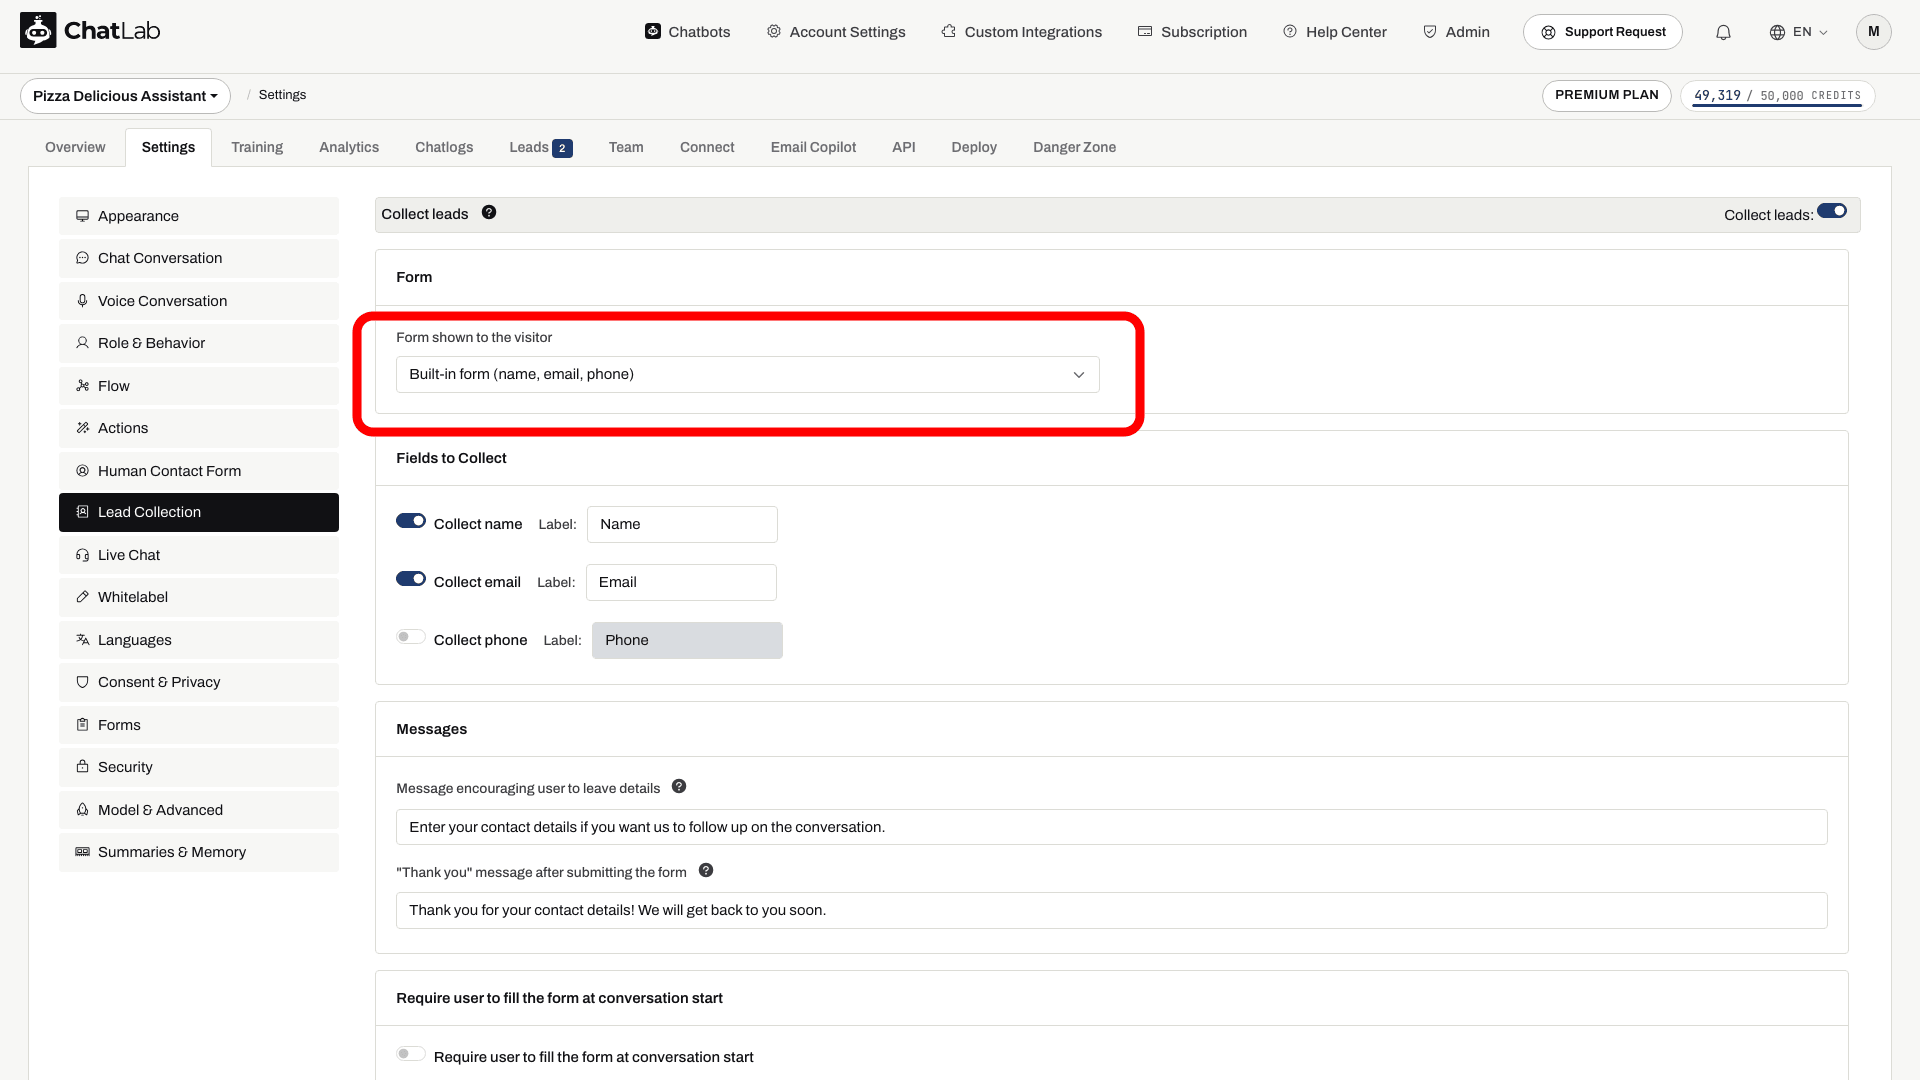
- Built-in form (name, email, phone) - l'opzione predefinita. Un modulo semplice con i campi nome, email e telefono, configurabile nella sezione Fields to Collect (Campi da raccogliere) in basso.
- Un modulo personalizzato - i moduli idonei che hai creato in Settings > Forms (Impostazioni > Moduli) compariranno qui con il rispettivo nome. I moduli personalizzati ti consentono di aggiungere campi extra (date, scelte multiple, caricamento file e altro) e di suddividere i moduli lunghi in più passaggi. Consulta l'articolo sui moduli personalizzati per scoprire come crearne uno.
- + Create a new custom lead collection form... - una scorciatoia che ti porta direttamente al costruttore di moduli con un modello pronto per la raccolta lead.
Vengono elencati solo i moduli personalizzati che contengono un campo Nome e un campo Email o Telefono - la raccolta lead richiede un recapito per contattare il visitatore. Quando selezioni un modulo personalizzato, il nome, l'email e il telefono del lead vengono associati automaticamente a partire dai primi campi Nome, Email e Telefono di quel modulo; inoltre, le etichette dei campi, il messaggio di invito e il messaggio di ringraziamento provengono tutti dal modulo stesso. In questo caso, la sezione Fields to Collect rimane nascosta. Tutti i dati inviati dal visitatore vengono memorizzati con il lead e mostrati nella colonna Form data (Dati del modulo) della scheda Leads.
I moduli personalizzati sono disponibili come funzionalità premium - se il tuo piano non li include, la scheda Form non viene mostrata e il tuo chatbot utilizzerà il modulo predefinito.
Campi da raccogliere
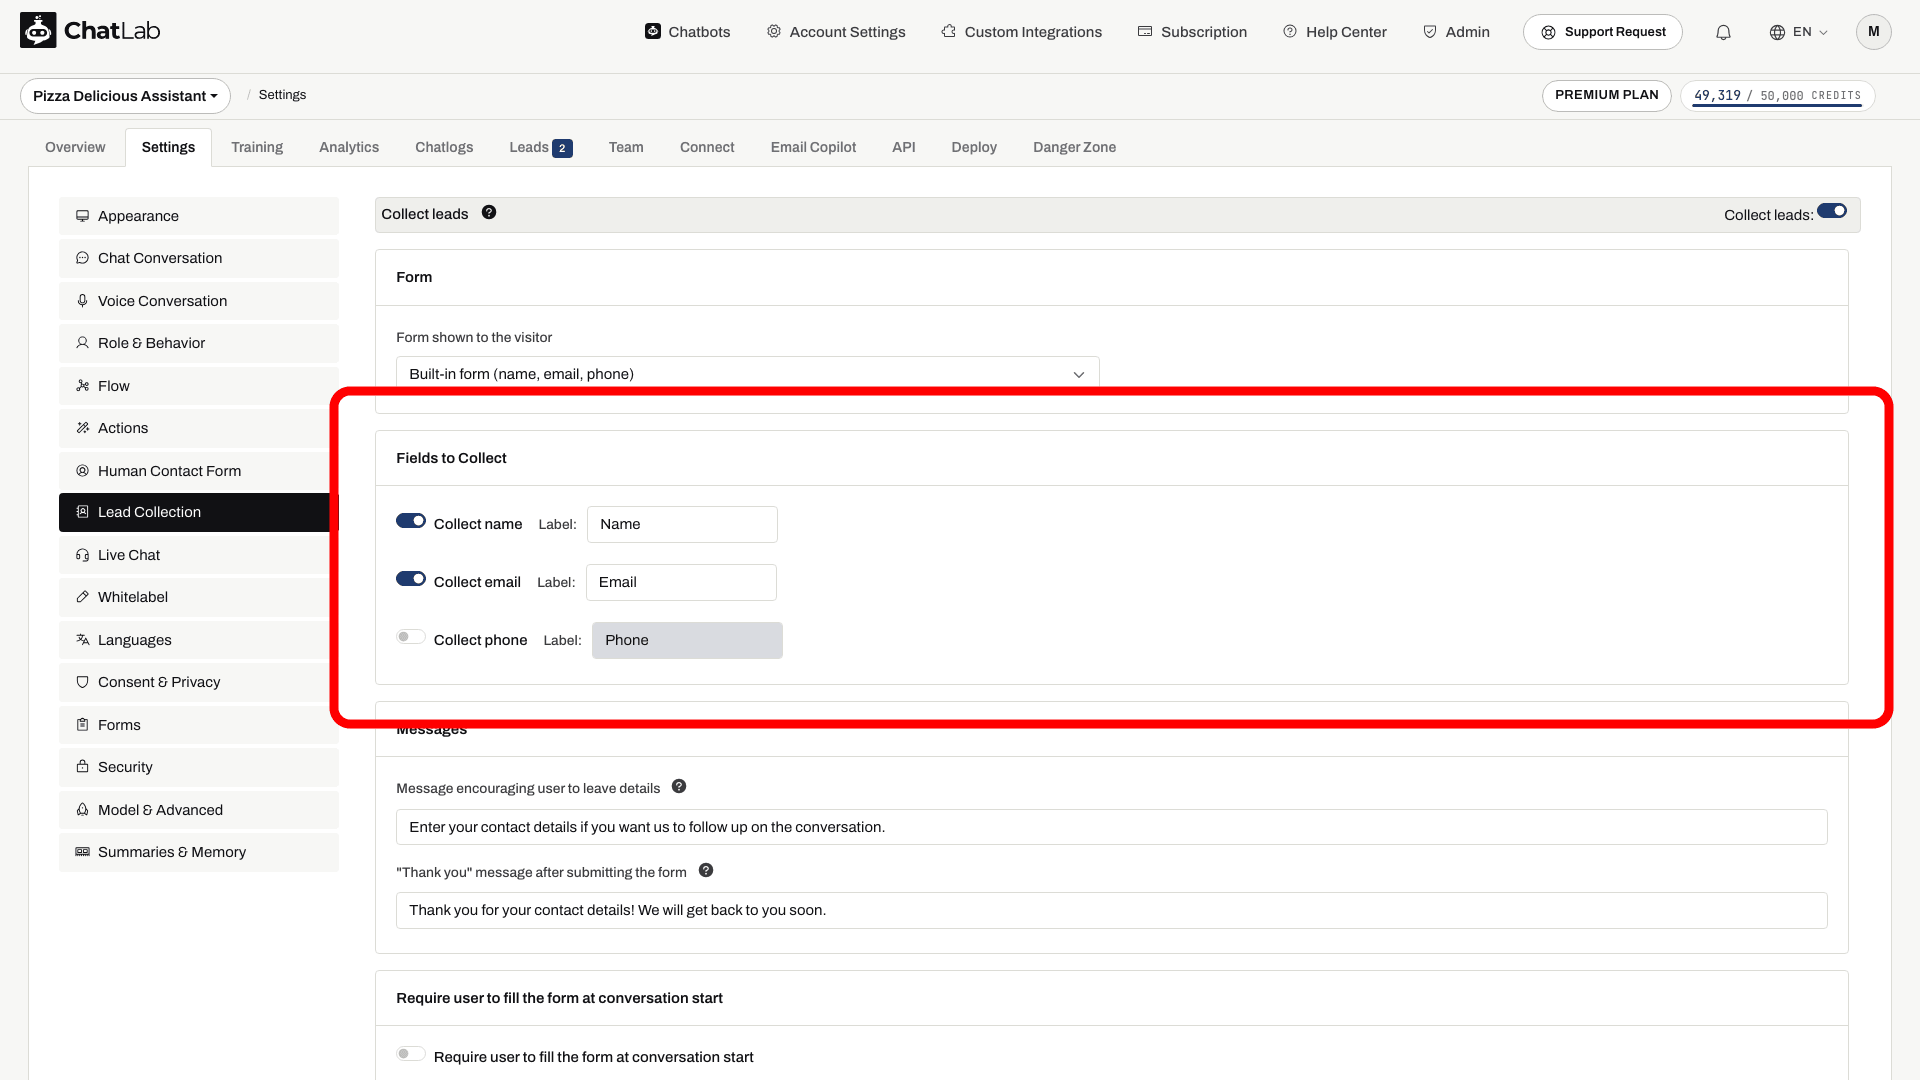
Quando è selezionato il modulo predefinito, scegli quali dati di contatto acquisire attivando o disattivando ciascun campo:
- Collect name (Raccogli nome) - nome del visitatore
- Collect email (Raccogli email) - indirizzo email del visitatore
- Collect phone (Raccogli telefono) - numero di telefono del visitatore
Ogni campo dispone di una voce Label (Etichetta) personalizzabile che compare nel modulo. È necessario abilitare almeno uno tra email o telefono.
Messaggi
- Message encouraging user to leave details (Messaggio che invita l'utente a lasciare i dati) - il testo visualizzato sopra il modulo di raccolta lead. Supporta il markdown per i link.
- "Thank you" message after submitting the form (Messaggio di ringraziamento dopo l'invio del modulo) - il messaggio di conferma visualizzato dopo che il visitatore ha inviato i propri dati. Supporta il markdown.
Quando viene selezionato un modulo personalizzato, questi messaggi provengono direttamente dal costruttore di moduli e questa sezione non viene applicata.
Attivazione del modulo
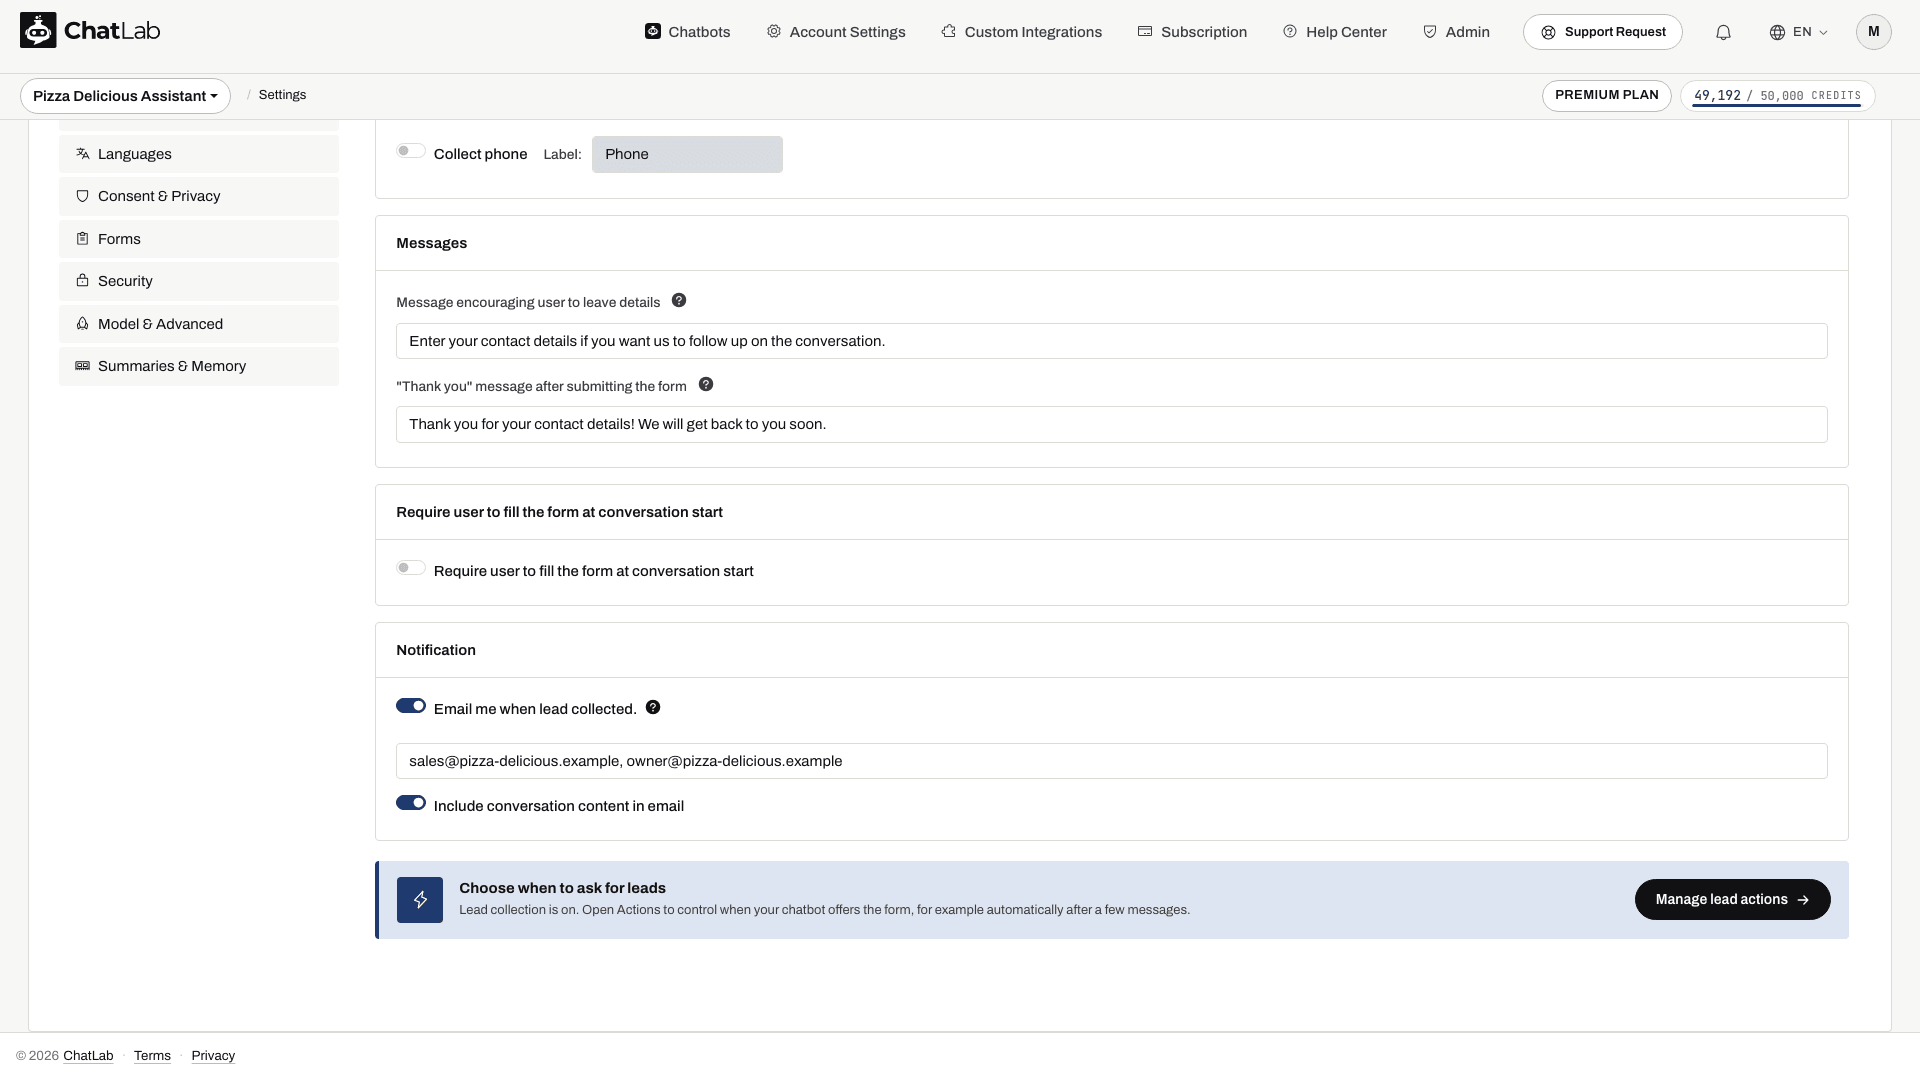
Attiva l'opzione Require user to fill the form at conversation start (Richiedi all'utente di compilare il modulo all'inizio della conversazione) per mostrare il modulo di acquisizione lead prima che il visitatore possa iniziare a chattare. Quando è abilitata, il modulo compare subito all'apertura della chat e deve essere completato prima di poter proseguire con la conversazione.
Per opzioni di attivazione più avanzate, vedi le azioni di acquisizione lead basate su IA di seguito.
Notifiche
Abilita Email me when lead collected (Inviami un'email quando viene raccolto un lead) per ricevere un'email ogni volta che un visitatore invia i propri dati di contatto.
- Inserisci uno o più indirizzi email per le notifiche (separati da virgola). Come impostazione predefinita viene utilizzata l'email del tuo account.
- Attiva Include conversation content in email (Includi il contenuto della conversazione nell'email) per ricevere la trascrizione completa della chat insieme ai dettagli del lead.
Azioni di raccolta lead basate su AI
Oltre a richiedere il modulo all'inizio della conversazione, puoi configurare trigger basati sull'intelligenza artificiale in Settings > Actions (Impostazioni > Azioni). Fai clic su Lead collection nel riquadro Filter by Platform (Filtra per piattaforma) per visualizzare le opzioni disponibili (il pulsante Manage lead actions in fondo alle impostazioni di Lead Collection porta alla stessa schermata):
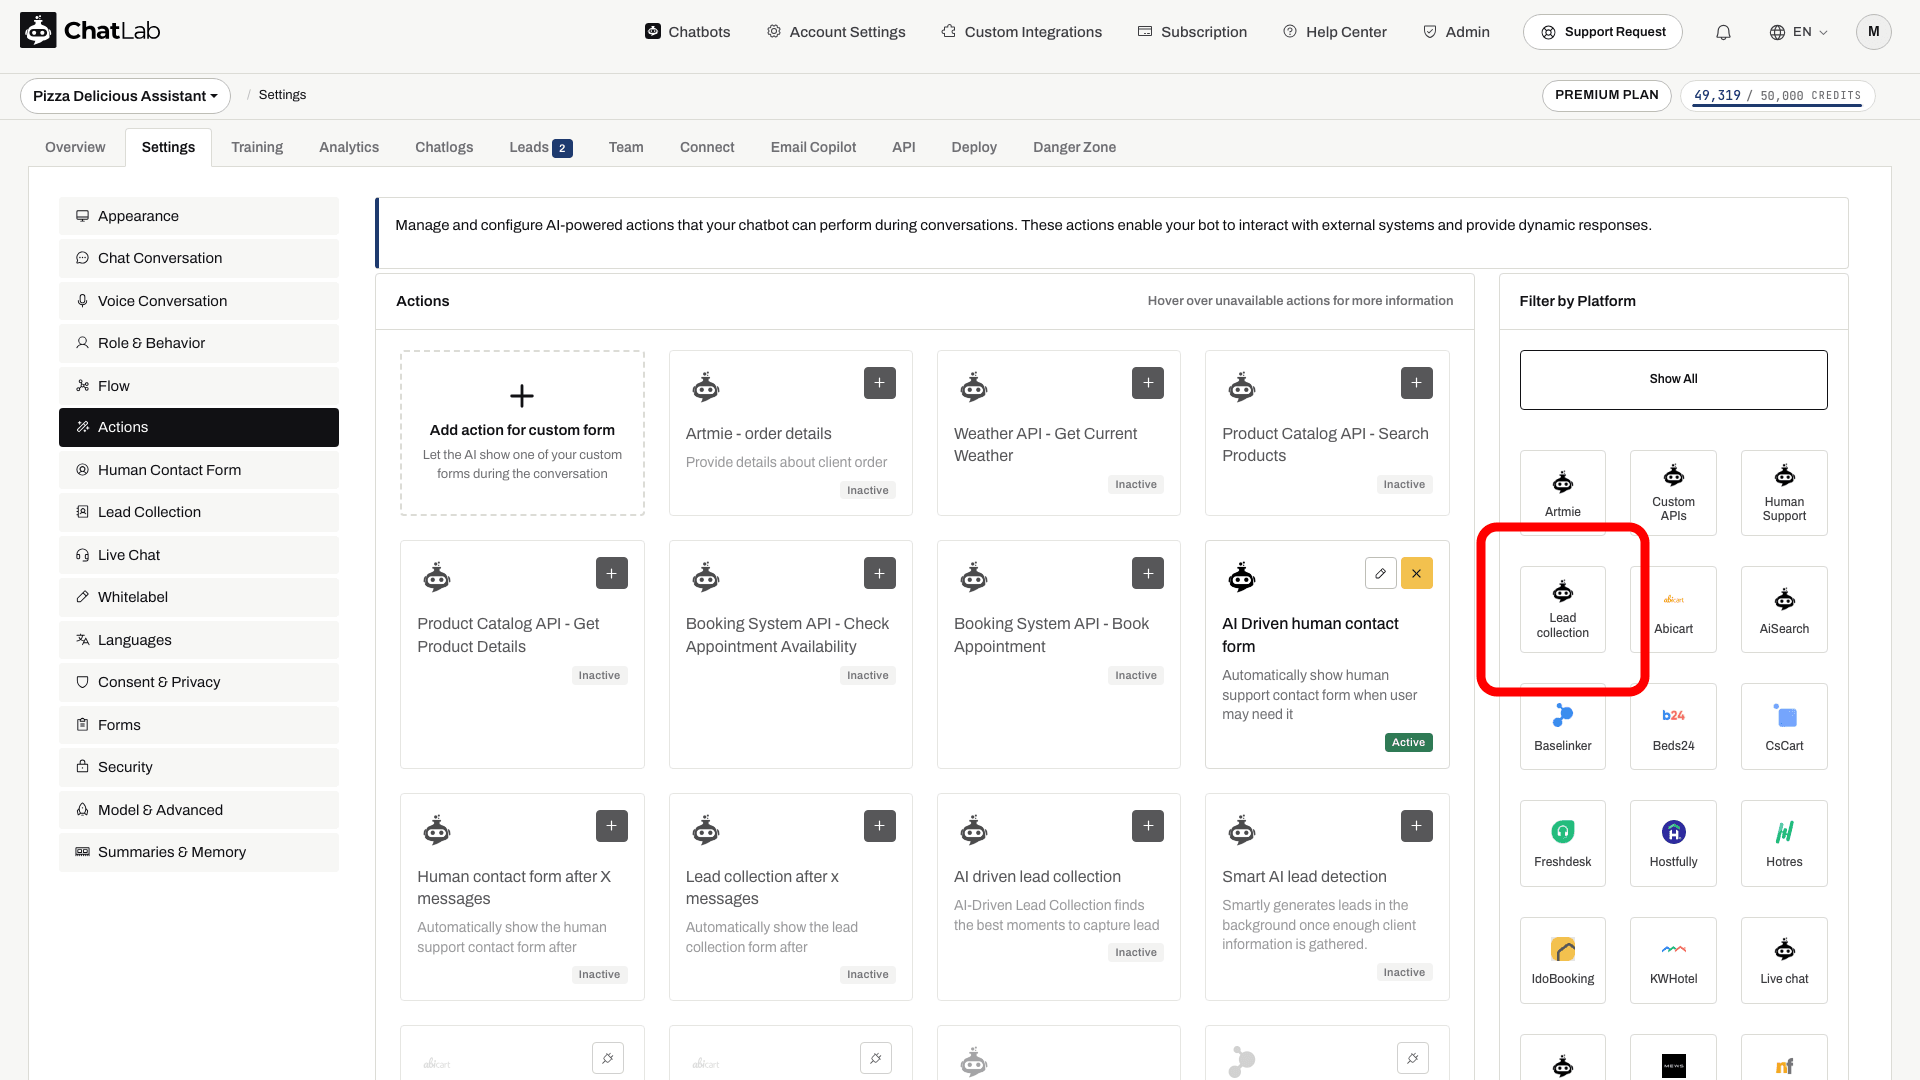
- Lead collection after x messages - mostra automaticamente il modulo di raccolta lead dopo un numero specificato di messaggi nella conversazione.
- AI driven lead collection - utilizza l'AI per rilevare il momento migliore durante la conversazione in cui richiedere i dati di contatto. Puoi personalizzare il prompt di rilevamento con le tue istruzioni.
- Smart AI lead detection - registra i dati di contatto in background quando il visitatore li menziona spontaneamente durante la conversazione (ad esempio digitando la propria email mentre fa una domanda), senza mostrare alcun modulo. Questa azione non è disponibile quando è abilitata l'opzione Require user to fill the form at conversation start, poiché il modulo raccoglie già i dati all'inizio.
Come appare la raccolta lead ai visitatori
Raccogli un contatto durante una conversazione
Configura la raccolta lead e il relativo trigger. Le notifiche richiedono una configurazione a parte.

Visitatore: Il vostro team può contattarmi per un ordine all'ingrosso?
Riproduci l'esempio o leggilo qui sotto. Non viene utilizzato alcun dato reale dei clienti.Il visitatore mostra interesse.
La riproduzione va in pausa quando questo esempio esce dallo schermo. Questa è una simulazione, non una chat dal vivo. I comandi del widget all'interno della riproduzione non sono interattivi.Leggi l'esempio completo
- Il visitatore mostra interesse.
Visitatore: Il vostro team può contattarmi per un ordine all'ingrosso?
- Il trigger configurato propone un modulo di contatto.
Assistente: Lascia i tuoi dati di contatto per essere ricontattato dal team.
- Il visitatore visualizza il modulo lead.
Il visitatore visualizza il modulo lead.
- Dopo l'invio riuscito, compare la conferma configurata.
Assistente: Esempio di conferma: grazie, abbiamo ricevuto la tua richiesta.
Quando viene attivato il modulo di raccolta lead, i visitatori vedono un modulo all'interno del widget di chat che richiede i loro dati di contatto. Compilano i campi e fanno clic su OK per inviarli, quindi visualizzano il tuo messaggio di ringraziamento.
Visualizza lo screenshot statico
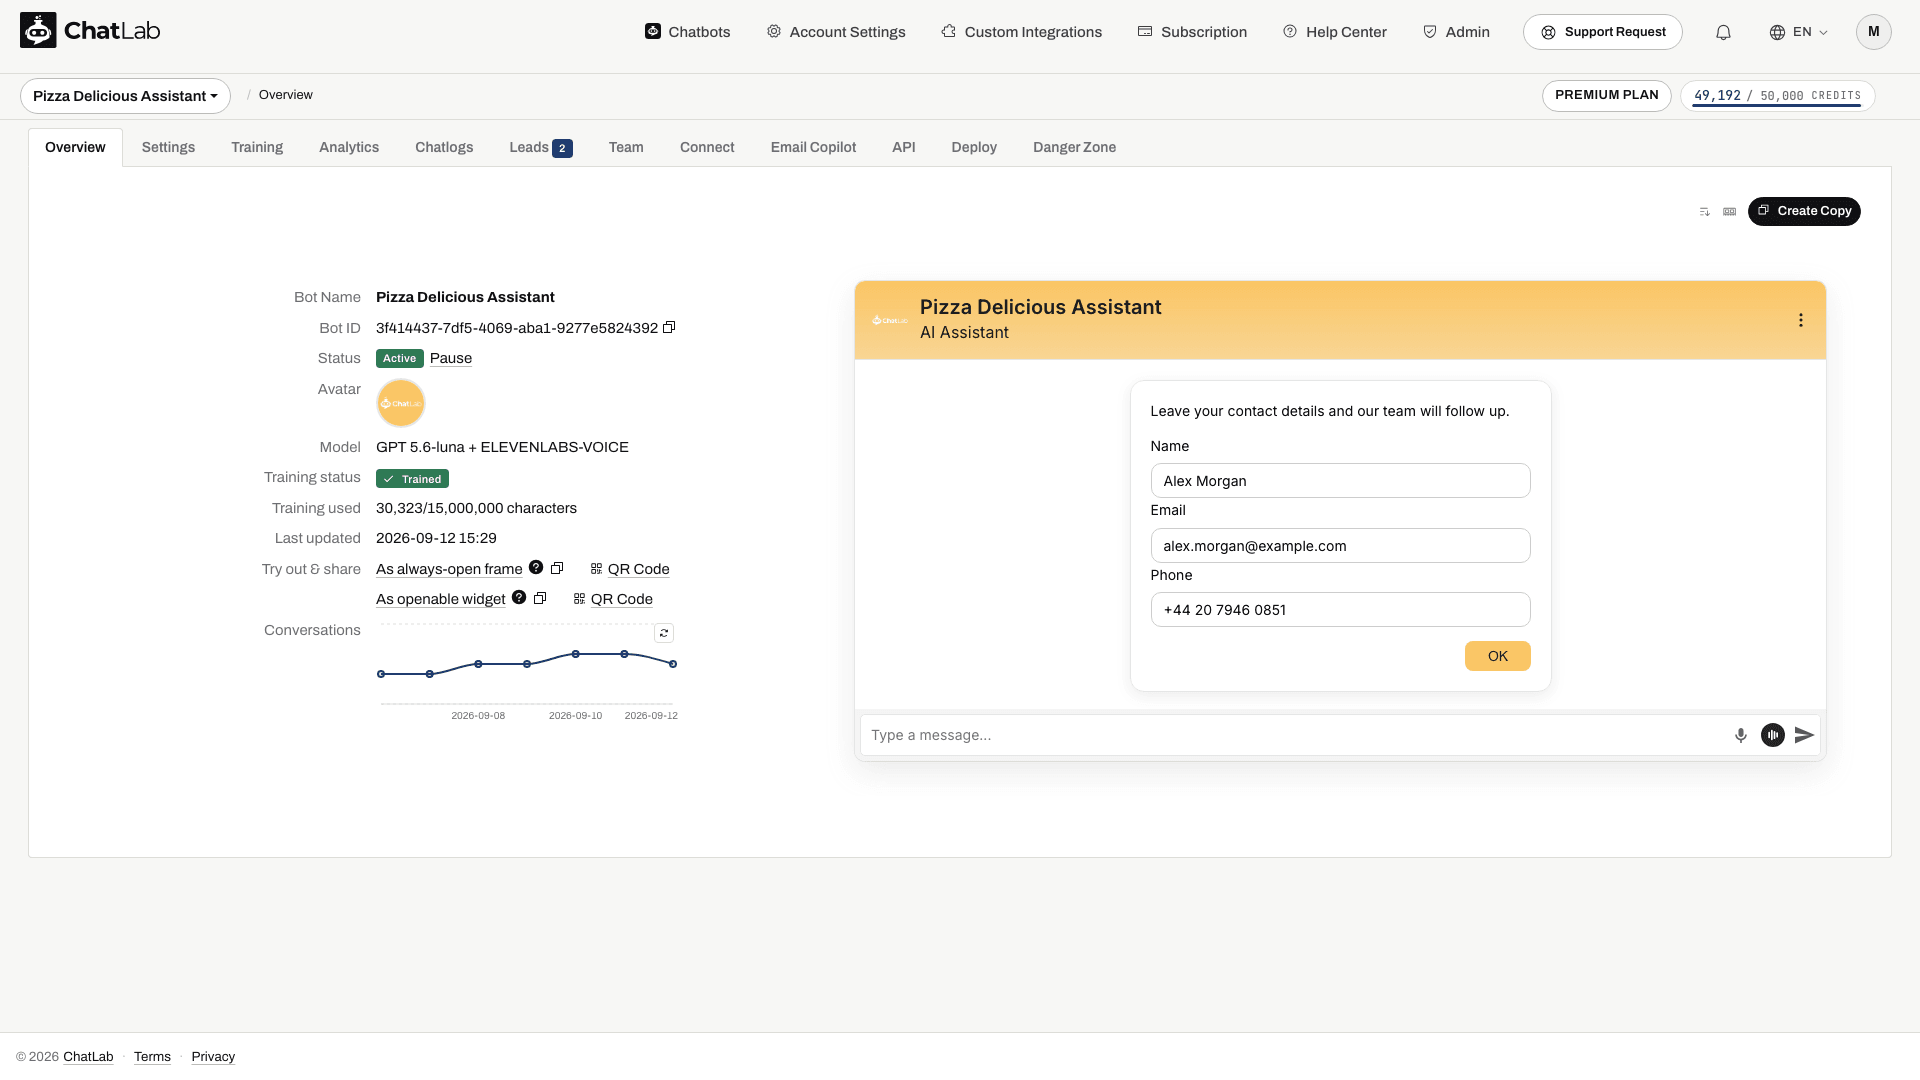
Puoi provarlo tu stesso nella scheda Overview (Panoramica), che mostra una versione di prova in tempo reale del tuo chatbot. Avvia una nuova conversazione di prova, attiva il modulo e invia dati di test. Quindi apri Leads (Lead), controlla l'intervallo di date selezionato e aggiorna l'elenco per verificare la presenza del record. Se le notifiche sono abilitate, usa una casella di posta che controlli e verifica la ricezione.
Visualizzare i lead raccolti
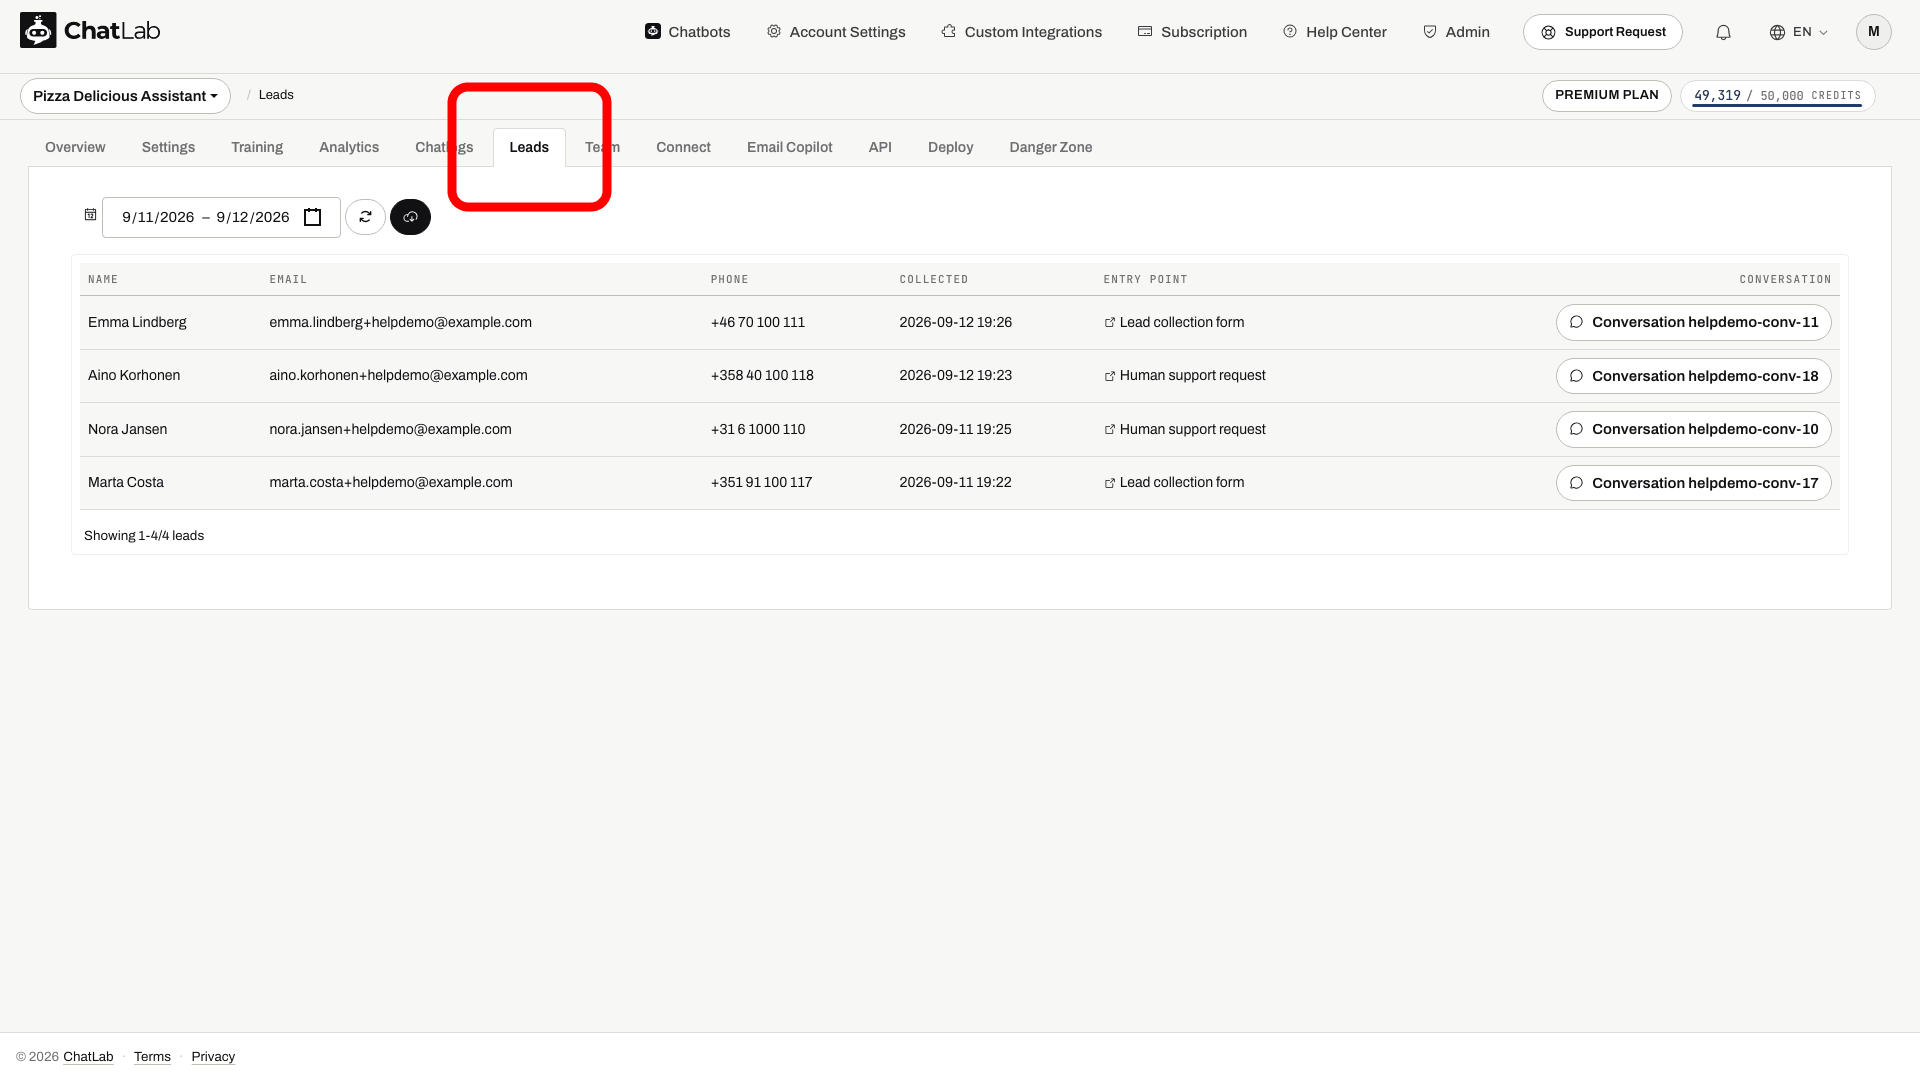
Seleziona il tuo chatbot e fai clic sulla scheda Leads. La tabella dei lead mostra tutti i dati di contatto raccolti con le seguenti colonne:
- Name, Email, Phone - i dati di contatto forniti dal visitatore (le intestazioni delle colonne corrispondono alle etichette dei campi configurate)
- Collected - data e ora di acquisizione del lead
- Entry point - l'URL della pagina o il canale in cui il visitatore ha interagito con il chatbot
- Form data - per i lead acquisiti tramite un modulo personalizzato, tutti i campi inviati con i rispettivi valori
- Conversation - un pulsante per aprire la conversazione completa associata a quel lead
Usa il selettore dell'intervallo di date per filtrare i lead per periodo di tempo. Fai clic sul pulsante di download per esportare i lead visualizzati in un file CSV.
Consenso all'informativa sulla privacy
Puoi richiedere ai visitatori di accettare un'informativa sulla privacy prima di inviare il modulo di raccolta lead. Questa impostazione si configura separatamente in Settings > Consent & Privacy (Impostazioni > Consenso e privacy): attiva l'opzione Require Privacy Policy consent for lead collection e inserisci un'etichetta di consenso con il link alla tua informativa.