To use Email Copilot, you first need to connect your email account. Use a dedicated mailbox with compatible IMAP or POP3 access for incoming mail and SMTP for outgoing mail. Create a chatbot first. Your subscription or add-ons must include an available email account allowance, and you need full access to the bot to configure the connection.
Connect your email account
Connecting an account is done from the Connect tab. The Email Copilot tab itself shows your inbox once an account is connected - before that it displays a Set up in Connect tab button that takes you to the same place.
- Select your chatbot and open the Connect tab
- Find the Email integration and click Connect - a terms of use dialog appears
- Read and accept the Email Copilot terms of use (covers AI processing, data retention, dedicated mailbox requirement, and your responsibilities as data controller)
- Enter your email address - the system auto-detects your provider and pre-fills server settings
- If your provider is not auto-detected, select it from the provider picker or click Other / Custom to enter settings manually
- Enter your username and password (for Gmail, use an App Password)
- Click Test Connection to verify the settings work
- Enable Enable email fetching if you want new messages downloaded automatically, then click Save. Saving checks both incoming and outgoing connections; fix any reported errors before continuing.
- Open Email Copilot. Use Refresh to fetch messages, then open a message and confirm the sender and body display correctly. See Reading and managing emails and Composing and sending replies to finish your first reply.
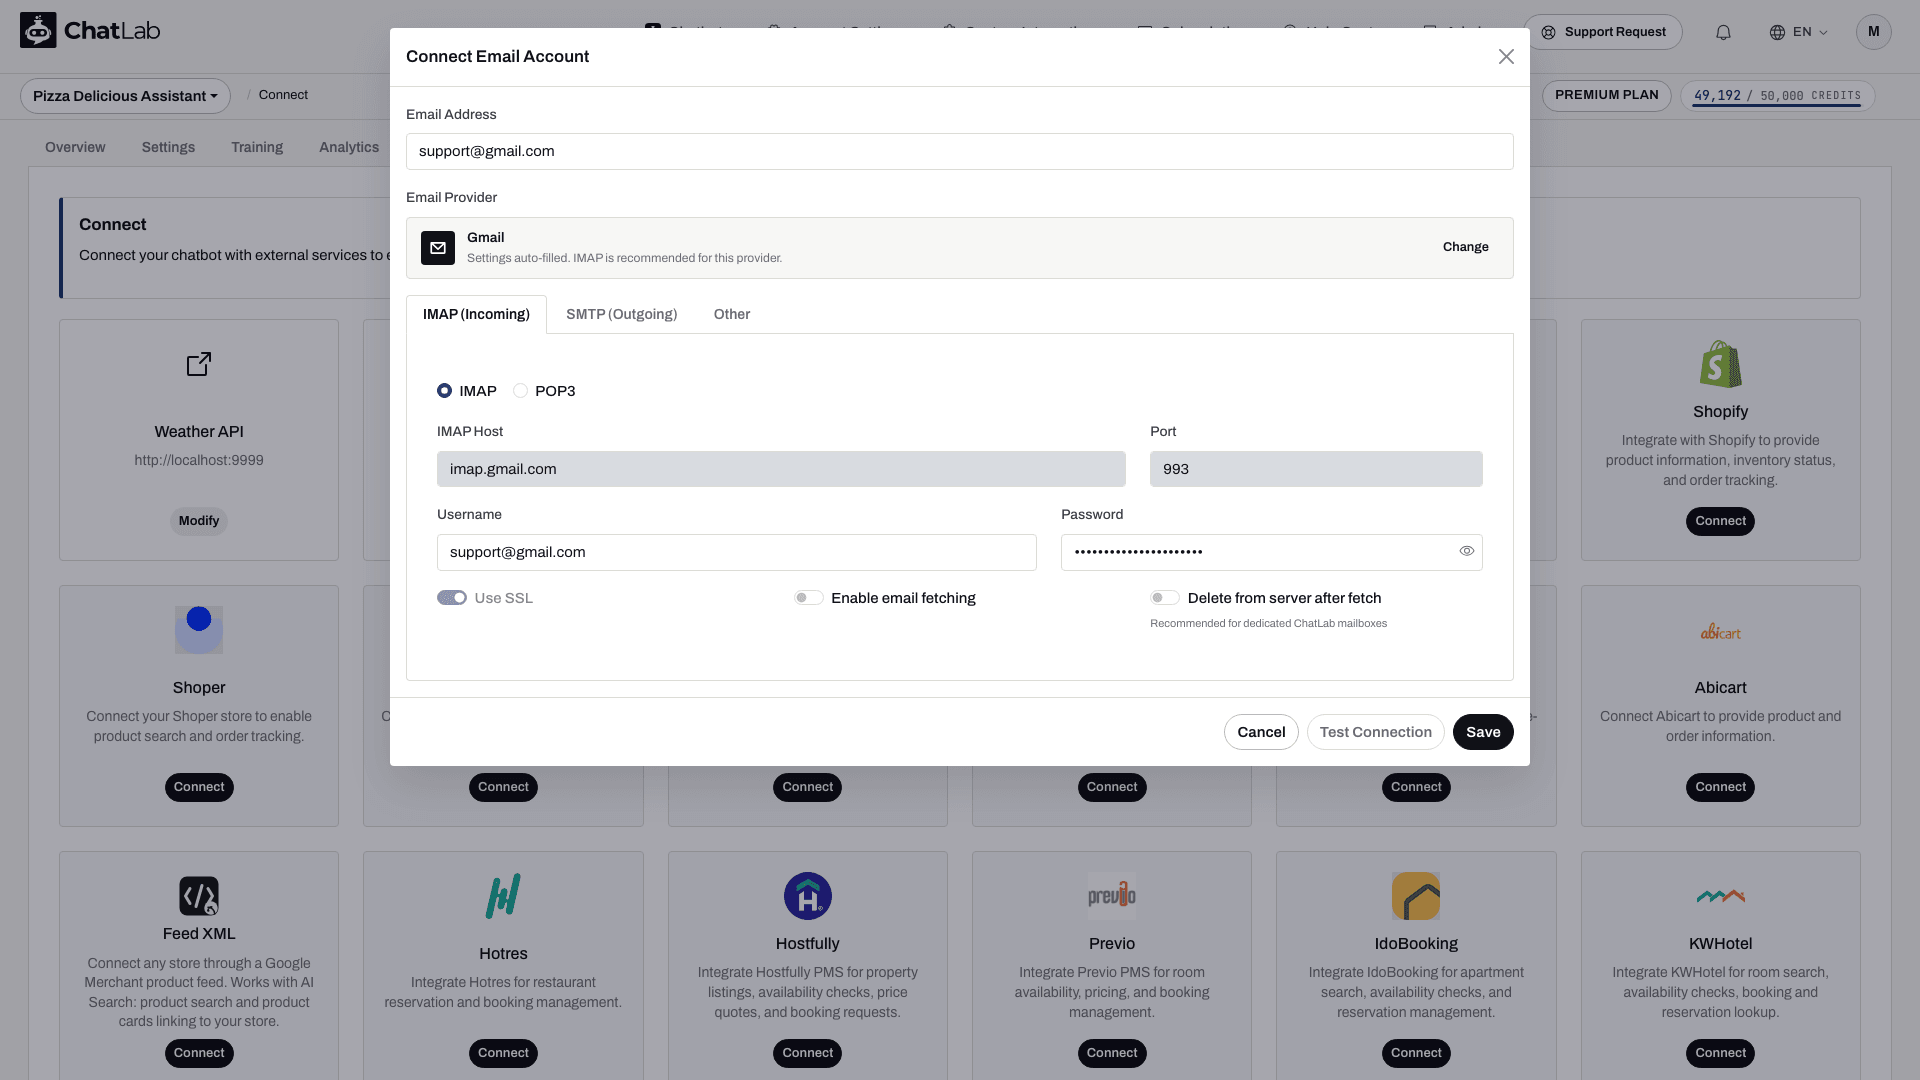
The account dialog groups its fields across the IMAP (Incoming), SMTP (Outgoing), and Other tabs. The screenshot below shows the dialog with these fields filled in.
Provider compatibility
The picker contains presets for several providers, but a preset is not a guarantee that the provider accepts this connection method.
- Gmail: app passwords require 2-Step Verification and may be unavailable under your account's security or organization policies. Follow Google's app-password instructions.
- Outlook.com: Microsoft requires Modern Authentication. This ChatLab form uses a username and password and does not offer Microsoft's OAuth sign-in, so the Outlook preset alone does not establish a supported connection. See Microsoft's authentication requirements.
- Proton Mail: desktop IMAP access uses Proton Mail Bridge. A Bridge running on your computer is not reachable as a local server from hosted ChatLab, so do not use the loopback-address preset as a working hosted configuration. See Proton's IMAP and SMTP guidance.
- Other providers: confirm both incoming access and SMTP authentication with your provider, then use Test Connection. Your provider may impose limits in addition to ChatLab's.
Incoming mail settings
On the IMAP (Incoming) tab:
- IMAP / POP3 - choose the protocol. IMAP is recommended for most providers
- Host and Port - auto-filled when you select a provider
- Use SSL - a toggle that enables an encrypted connection to the incoming mail server. Use the encryption and port settings supplied by your provider
- Enable email fetching - toggle on to have ChatLab automatically check for new emails every 30 minutes
- Delete from server after fetch - enable only if this is a dedicated ChatLab mailbox. This removes emails from the mail server after fetching them
Outgoing mail settings
On the SMTP (Outgoing) tab, configure the SMTP server, port, and credentials for sending replies. Presets can fill these fields, and the form displays a Use SSL/TLS toggle. The current sending service requires STARTTLS; use an SMTP endpoint that supports it and verify both connection tests before saving.
Daily send limit
On the Other tab, set the maximum number of emails you can send per day (1 - 300, default is 100). This prevents accidental mass sending.