Connect your ChatLab chatbot with your IdoBooking reservation system to provide real-time availability information and booking assistance to your website visitors.
Example conversation
From travel dates to room offers
Requires a supported accommodation integration and enabled availability action. An offer or enquiry does not confirm a reservation.

Visitor: A room for two adults, 14 to 16 August.
Play the example or read it below. No real customer data is used.Collect the stay requirements.
Playback pauses when this example leaves the screen. This is a simulation, not a live chat. Widget controls inside the playback are not interactive.Read the complete example
- Collect the stay requirements.
Visitor: A room for two adults, 14 to 16 August.
- Ask for missing date details before searching.
Assistant: Which year would you like to stay?
- The guest supplies the year.
Visitor: 2027.
- Query the connected accommodation system.
Checking room availability...
- Present the offers returned for that stay.
Sea-view double, €280 / stay. Example offer for two adults, two nights.
- Continue using the booking route supported by your integration.
Assistant: Review the booking page for the final price and conditions. No reservation has been made in this demonstration.
The example illustrates the customer experience. The available actions and returned information depend on this integration and your configuration.
Before you start
Create or select a chatbot first. You need permission to manage its integrations and access to the external account's connection settings. If the Connect tile shows an upgrade or contact prompt, check that your subscription includes this integration. Keep API credentials private; never paste them into website embed code.
What the Integration Provides
With the IdoBooking integration enabled, your chatbot can:
- List available apartments and accommodations with descriptions and photos
- Check availability for specific dates
- Find available apartments for a given date range with pricing
- Look up existing reservations by ID, status, or date range
- Create new reservations with guest details
There are two ways to set up this integration - through the IdoBooking Marketplace (recommended) or manually through the ChatLab admin panel.
Option A: IdoBooking Marketplace Setup (Recommended)
The fastest way to connect ChatLab with IdoBooking is through the IdoBooking Marketplace. This method handles API credentials automatically and enables the read actions for your chatbot.
Step 1: Install ChatLab from the IdoBooking Marketplace
- Log in to your IdoBooking administration panel
- Go to the Marketplace section
- Find ChatLab and click Install
IdoBooking sends your API credentials to ChatLab automatically - no need to create a separate API user or copy credentials manually.
Step 2: Create or Log in to Your ChatLab Account
After activating ChatLab in the marketplace, you are redirected to a guided setup wizard. If you already have a ChatLab account, log in. Otherwise, create a new account.
Step 3: Choose a Subscription Plan
Select a subscription plan that fits your needs. The IdoBooking booking integration features (apartment search, availability checking, reservations) require the IdoBooking integration feature. If your subscription does not include it, follow the upgrade or contact prompt.
Step 4: Select a Chatbot
Choose an existing chatbot to connect with IdoBooking, or create a new one. The wizard can create a new bot for you automatically.
Step 5: Complete the Setup
The wizard automatically:
- Connects your IdoBooking credentials to the selected chatbot
- Enables apartment search, availability checks and reservation lookup. Creating reservations is not enabled automatically.
- Redirects you back to IdoBooking or to the ChatLab admin panel
After completing the wizard, your chatbot is ready to handle booking inquiries. You can fine-tune individual AI actions in Settings > Actions.
Option B: Manual Setup
If you prefer to configure the integration manually, follow these steps.
Part 1: Creating an API User in IdoBooking
Before connecting ChatLab to your IdoBooking system, you need to create a dedicated user with API access in your IdoBooking panel.
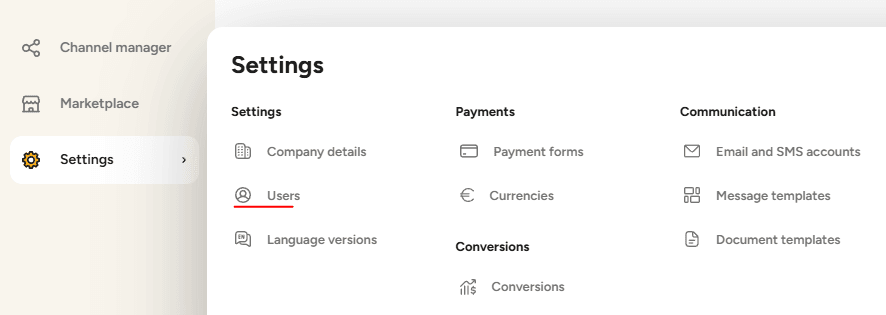
Step 1: Navigate to User Management
- Log in to your IdoBooking administration panel
- Go to Settings > Users
- Click Add new user
Step 2: Create User Account
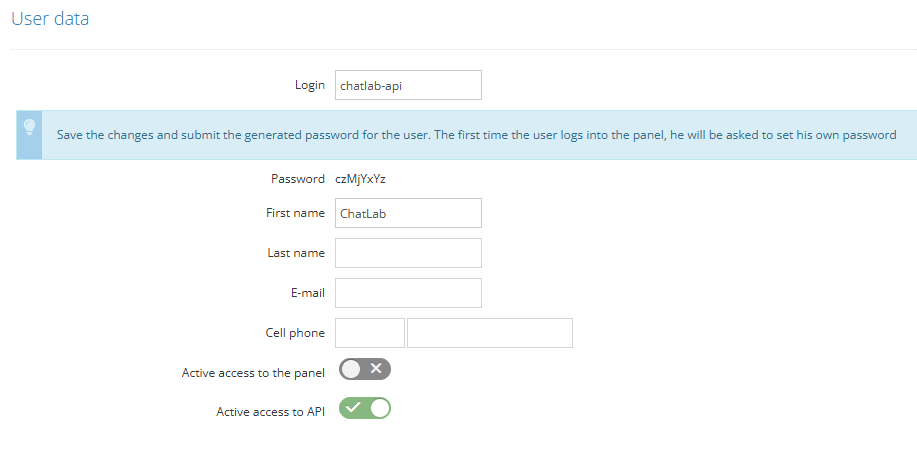
- Enter a login name for the new user (e.g., "chatlab-api")
- Fill in the remaining required information
- Set a secure password for this account
Step 3: Configure API Access
Configure the following access settings for the new user:
- Enable "Active API access" - this is required for the integration to work
- Disable "Active panel access" - the user does not need access to the admin panel
Step 4: Set User Role and Permissions
You have two options for configuring the user role:
Option A: Administrator Role (Simpler)
- Select Administrator as the role
- This grants broad API permissions even when panel access is disabled. Use a custom role if the integration only needs selected read operations.
Option B: Custom User Role (More Granular)
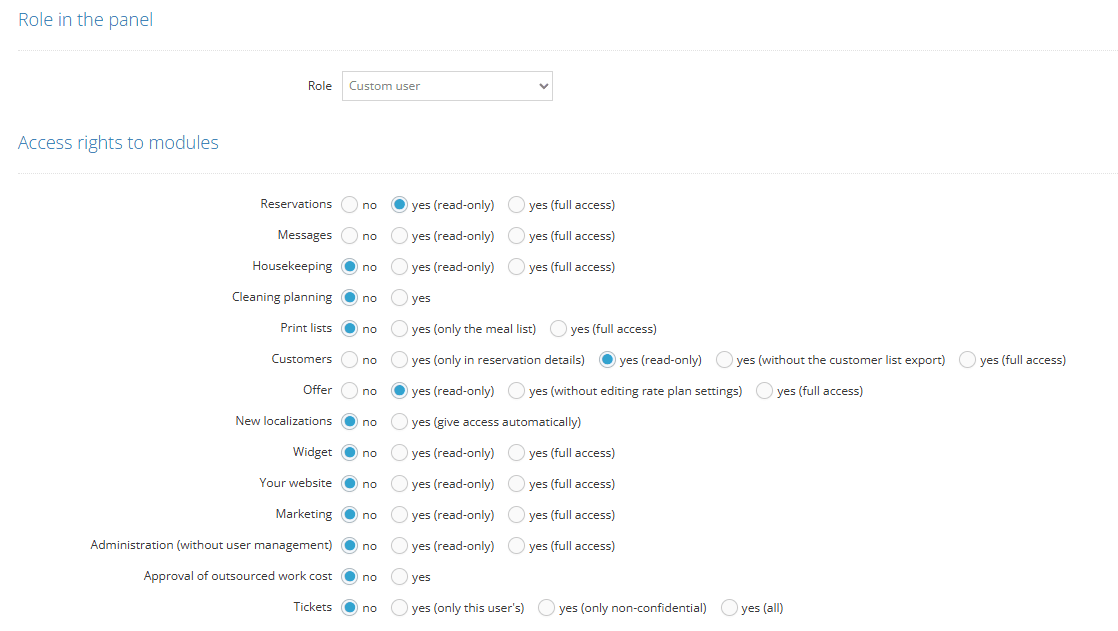
If you prefer more granular control, select Custom user and configure the following module permissions:
- Reservations - Read-only (if chatbot should only retrieve reservation info) or Full access (if chatbot will create reservations)
- Customers - Read-only
- Offers - Read-only
For custom users, you also need to configure location permissions:
- Scroll to Location and accommodation permissions section
- Select the properties this chatbot should cover; grant access to all only if that is your intended scope.

Step 5: Disable Unnecessary Notifications
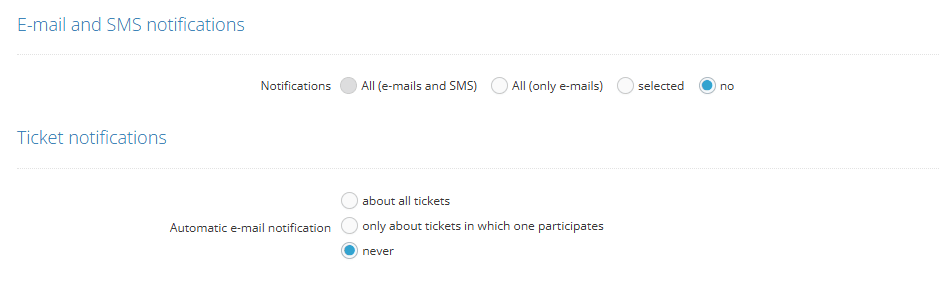
To prevent the API user from receiving operational notifications, disable the following options:
- Notifications for property staff - Disable
- Automatic email notifications - Disable
Step 6: Save and Gather Connection Details
- Click Save to create the user account
- Note down the following information - you will need it for ChatLab configuration:
- Login - The username you created (e.g., chatlab-api)
- Password - The password you set
- Subdomain - Your IdoBooking subdomain (e.g., client3760)
Finding your subdomain: Look at your IdoBooking panel URL. For example, if your URL is https://client3760.idosell.com, your subdomain is client3760.
Part 2: Setting Up the Integration in ChatLab
Step 1: Navigate to Connect tab
- Log in to your ChatLab admin panel
- Select the bot you want to configure
- Go to the Connect tab
- Find and click on IdoBooking in the integrations list

Step 2: Enter Connection Details
Fill in the connection form with the information gathered from IdoBooking:
- Client Subdomain - Enter your IdoBooking subdomain (without the full URL). Example:
client3760(nothttps://client3760.idosell.com) - System Login - Enter the username of the API user you created in IdoBooking
- System Password - Enter the password for the API user
- Default Currency - Select the currency for pricing information
- Default Language - Select the language for property descriptions

Step 3: Connect
- After filling in all required fields, the Connect button becomes active
- Click Connect to establish the connection
- Wait for the confirmation message
- Once connected, you will see a success notification
After successful connection, the button changes from "Connect" to "Update Chatbot", and a "Disconnect" button appears if you need to disable the integration later.
Configuring AI Actions
Once your IdoBooking integration is connected (through either method), you can configure which AI actions your chatbot can perform. Review the active actions after either setup method. Reservation creation is not enabled automatically.
Available AI Actions
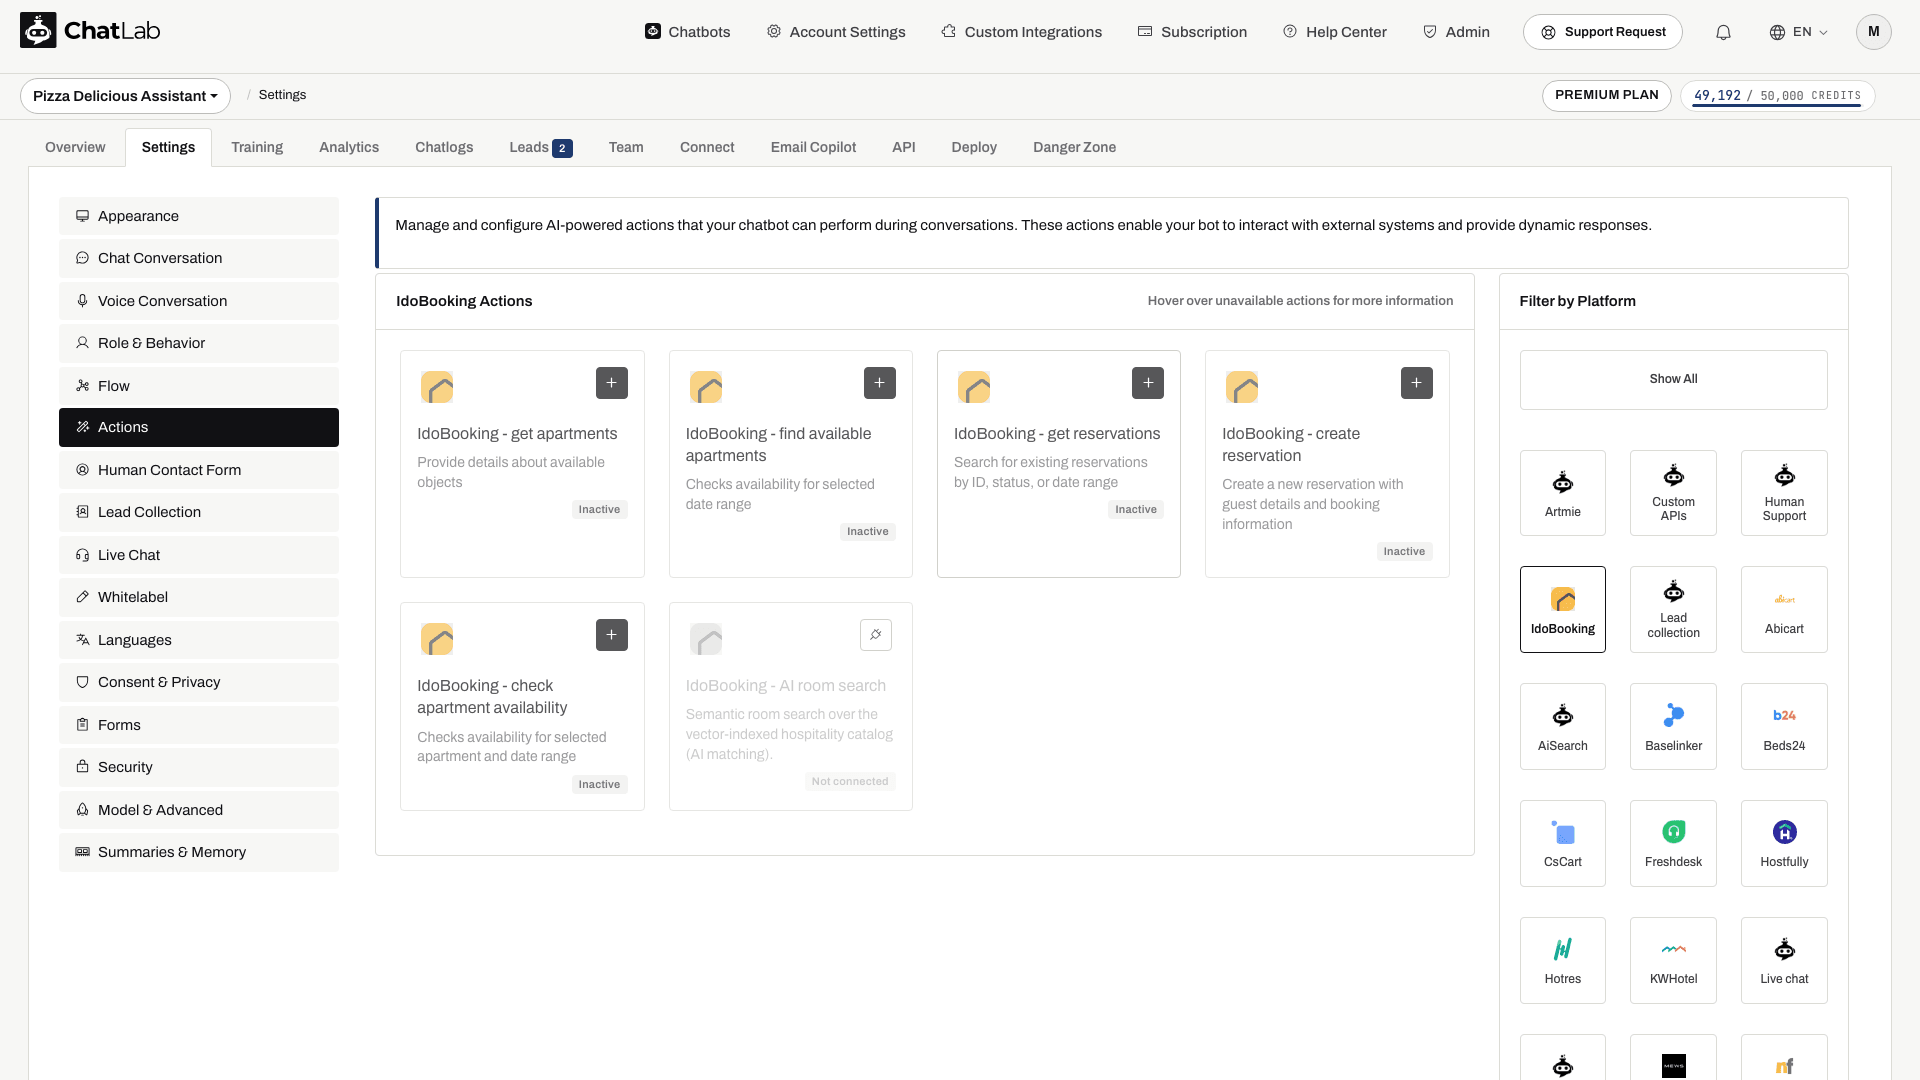
- Get Apartments - Lists available apartments and accommodations with descriptions, bed configurations, and photos
- Find Available Apartments - Searches for available apartments for a given date range with pricing information
- Check Apartment Availability - Checks availability for a specific apartment and date range
- Get Reservations - Looks up existing reservations by ID, status, or date range
- Create Reservation - Creates new reservations with guest details and booking information
- AI room search - Matches a guest's description of what they want against your room descriptions, rather than checking dates
AI room search and Get Apartments are alternatives, not additions. When AI room search is on, it replaces the plain listing tool and Get Apartments is withdrawn from the chatbot, so only one room-listing tool is ever active. The date-based actions are unaffected.
Enabling and Customizing Actions
- After connecting, click Configure AI Actions in the success modal, or navigate to Settings > Actions and find the IdoBooking category
- Toggle the actions you want to enable
- Customize the action label (the text displayed to users while the action is running) and instructions as needed
- In the action dialog, click Enable for a new action or Update for an existing action.
Configuring "Find available apartments"
The Find available apartments action has two extra controls that decide how many apartments the chatbot shows when a guest asks about availability and which apartments make the cut. Open the action from Settings > Actions > IdoBooking - find available apartments to access them.
Number of offers to show
A slider that ranges from 3 to 10 (default 6). It controls how many apartments the chatbot returns to the user in a single response.
- Lower values (3-4) keep the answer short and focused, useful when most guests are deciding between just a few favourites.
- Higher values (8-10) give guests more variety to compare, useful for properties with a wider catalogue.
Offer selection strategy
A dropdown that decides which apartments are picked from the full list of available results once filtered by date and guest count. Four options are available:
- Cheapest offers (default) - returns the apartments with the lowest minimum price, sorted from cheapest to most expensive. Good when guests are price-sensitive or you want to lead with the most accessible options.
- Evenly distributed by price - picks apartments spread evenly across the price range. For example, with 9 offers this gives roughly 3 cheapest, 3 mid-priced, and 3 most expensive. Useful when you want guests to see the full range of what is available rather than only the budget end.
- Most expensive offers - returns the highest-priced apartments, sorted from most to least expensive. Good for premium properties or when you want to lead with your top-tier inventory.
- Random selection - picks apartments at random from the filtered results. Useful when you want to vary which apartments are highlighted between conversations and avoid always recommending the same ones.
Both settings are saved per-bot, alongside the existing custom prompt and action label.
Test the completed setup
Open Overview and start a new test conversation. Ask for rooms for a future date range and a specific guest count, then open the returned booking link and compare the dates, currency and price with IdoBooking. Test reservation lookup with a reservation you are authorized to inspect. Only enable and test Create Reservation when you intend to create a real booking; a chat test can write to your booking system.
Best Practices
Security Recommendations (Manual Setup)
- Use a dedicated API user - Create a separate user specifically for the ChatLab integration rather than using your personal admin account
- Minimal permissions - Only grant the permissions necessary for your use case. Use read-only access if the chatbot only needs to retrieve information
- Regular credential rotation - Periodically update the API user password, then update the credentials in ChatLab
Optimizing Chatbot Responses
- Train your bot with property information - Add descriptions of your accommodations to the knowledge base, including amenities, room features, and location details
- Set clear conversation flows - Configure welcome messages that guide users to ask about availability, and use suggested questions like "Check availability" or "View rooms"
Troubleshooting
- Connection fails - Verify that "Active API access" is enabled for the user in IdoBooking
- "Access denied" errors - Check that the user has the correct module permissions
- No data returned - Ensure the user has access to the relevant locations and properties
- Incorrect subdomain - Check your IdoBooking URL and extract only the subdomain part (e.g.,
client3760fromhttps://client3760.idosell.com)
Room Catalog and Hotel Overview
If your account shows the Hotel tab, use Hotel > Rooms to review the room catalog and training status. AI room search is separate from date-based availability checks: it matches room descriptions, while availability actions check a requested stay. Automatic room indexing depends on catalog auto-indexing and assigned room capacity; otherwise, use Train rooms when available. Review the enabled actions and wait for training to finish before relying on AI room search.