Connect your ChatLab chatbot with your PrestaShop store to give customers real-time access to product information and order tracking directly in the chat.
Example conversation
Check an order
Requires a connected store and its enabled order action. Available fields depend on the integration. Matching an email address is not proof of identity.
Visitor: Where is my order?
Play the example or read it below. No real customer data is used.The customer asks about an existing order.
Playback pauses when this example leaves the screen. This is a simulation, not a live chat. Widget controls inside the playback are not interactive.Read the complete example
- The customer asks about an existing order.
Visitor: Where is my order?
- The default lookup needs both identifiers.
Assistant: Please give me your order number and the email address used at checkout.
- Use fictional data in this example.
Visitor: 41982, anna@example.com
- The action queries the connected store.
Checking order 41982...
- Report only information returned by the store.
Assistant: Order 41982 is marked as shipped. The carrier is DPD. Please check the tracking page for delivery updates.
The example illustrates the customer experience. The available actions and returned information depend on this integration and your configuration.
Important: E-Commerce Best Practices
After completing the integration below, read the comprehensive guide on optimizing your chatbot for e-commerce: How to set up ChatLab for your E-commerce store
What the Integration Provides
Product Search - Customers can search your PrestaShop catalog by entering a phrase. The chatbot searches across product titles and descriptions, returning the top 5 matching products with:
- Product ID, name, and description
- Price (optionally with tax and specific price discounts applied)
- Direct link to the product page in your store
- Product image
Product Search by Reference (SKU) - Customers can look up products using exact reference codes. The chatbot searches across multiple identifier types - reference/SKU, EAN-13 barcode, ISBN, and MPN - on both products and their variants (combinations). This is useful when customers have a specific product code from a catalog, invoice, or packaging.
Order Details - By default, customers provide an order ID and the email address associated with the order. Both are matched against store records; this is not proof of email ownership. The optional Allow order lookup without email verification setting permits order-ID-only lookup. Keep it off unless your deployment has appropriate access controls. The chatbot returns:
- Order reference, date, and current status (e.g., processing, completed, cancelled)
- Order total
- Recipient name, company, full delivery address (street, city, postal code), and phone number
- Carrier name and tracking numbers (multiple tracking numbers supported)
- Ordered items with names, quantities, and individual prices
Prerequisites
Before starting the PrestaShop integration, make sure:
- Your chatbot is created in ChatLab. Store-data connection and widget installation are separate steps; the module can handle both.
- You have access to your PrestaShop admin panel (back office)
Recommended: Connect with the Module
For a new installation, use the guided PrestaShop module setup. Connect my store lets you sign in to ChatLab and select your chatbot. The manual webservice steps below are an alternative; do not create a second connection if the module has already connected the store.
Step 1: Enable the Webservice in PrestaShop
- Log in to your PrestaShop back office
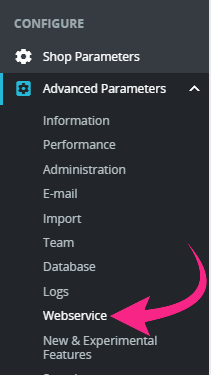
- Go to Configure > Advanced Parameters > Webservice
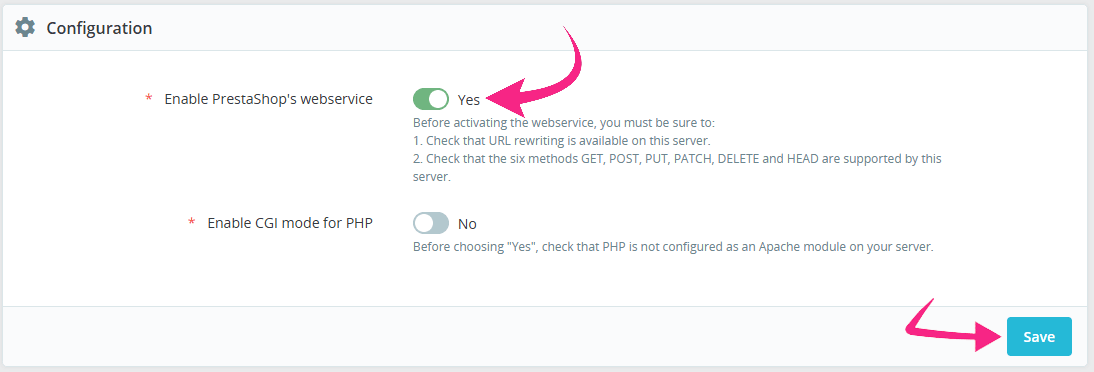
- Scroll down to the Configuration section
- Set Enable PrestaShop's webservice to Yes
- Click Save
Step 2: Create a Webservice Key
- On the same Webservice page, click Add new webservice key

- Click Generate to create a new key
- Enter a description (e.g., "ChatLab Integration")
- Make sure the key is Enabled
- Under resource permissions, grant View (GET) access to the following resources:
addressesattachmentscarrierscategoriescombinationsconfigurationscustomerslanguagesorder_carriersorder_detailsorder_statesordersproduct_customization_fieldsproduct_feature_valuesproduct_featuresproduct_option_valuesproduct_optionsproductssearchspecific_price_rulesspecific_pricesstatesshopsstock_availablestagstax_rule_groupstax_rulestaxes
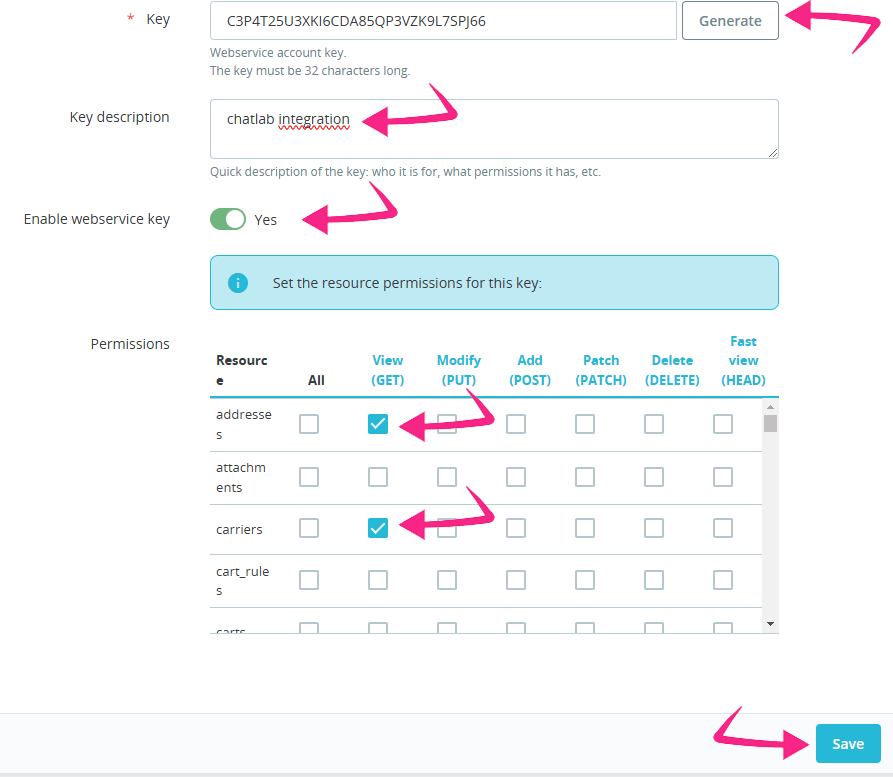
- Click Save
- Copy the generated webservice key - you will need it in the next step
Step 3: Find Your Product URL Format
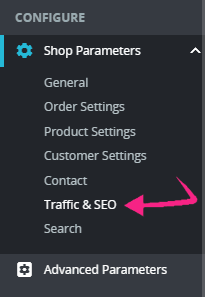
- In the PrestaShop back office, go to Configure > Shop Parameters > Traffic & SEO
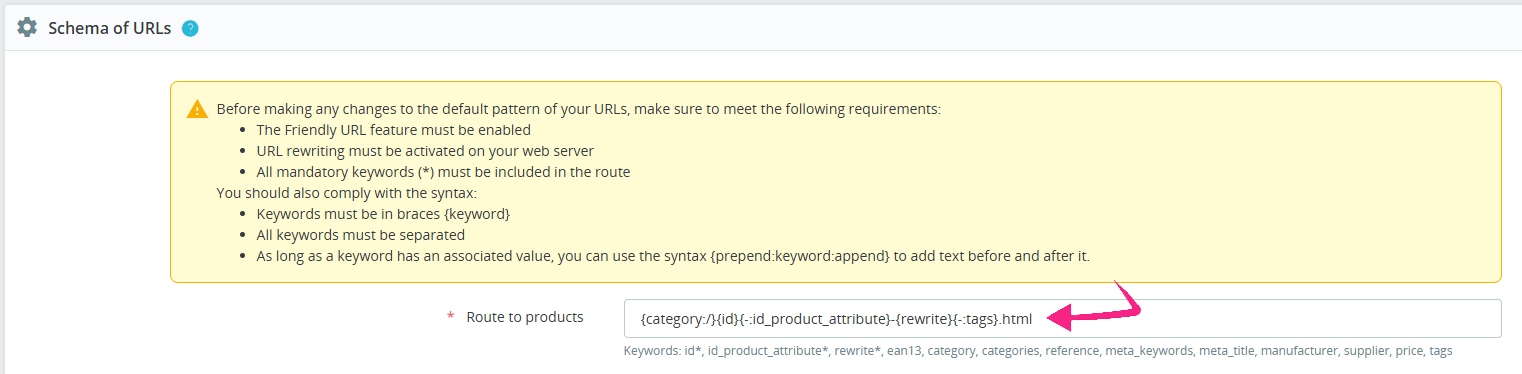
- Scroll down to the Schema of URLs section
- Copy the value from the Route to products field (e.g.,
{category:/}{id}{-:id_product_attribute}-{rewrite}{-:tags}.html)
Step 4: Connect PrestaShop in ChatLab
- Log in to ChatLab and select your bot
- Go to the Connect tab

- Click Connect on the PrestaShop tile
- Enter your Webservice key (from Step 2)
- Enter your Shop url (the full URL of your store, e.g.,
https://www.mystore.com) - Enter your Product url format (from Step 3)

- Click Initialize Configuration - this fetches available languages and shops from your store
- Select the correct Default language and, when offered, the intended Prestashop store
- Click Connect
ChatLab automatically tests the connection by verifying that your webservice key has the required access. If successful, you will see a confirmation message.
Step 5: Configure PrestaShop Actions
After connecting, you can enable and customize individual AI actions. Navigate to Settings > Actions and filter by the PrestaShop platform.

The following actions are available:
- Prestashop - product search - enables the chatbot to search your product catalog by name
- Prestashop - search by reference - enables the chatbot to find products by reference/SKU, EAN-13, ISBN, or MPN codes
- Prestashop - order details - enables the chatbot to look up order information
- Prestashop - get product variants - enables the chatbot to retrieve detailed variant information (sizes, colors) for a specific product
Connection setup enables the standard actions. Review their status and disable any you do not want customers to use. Open an action to edit it, then use Enable or Update in its dialog. You can also customize the action label (the message shown to users while the action runs) and the instructions that guide how the AI uses each action.
When the "Search by reference" action is enabled, the regular product search will also automatically fall back to a reference code search if no results are found by name. This means customers can enter a SKU or barcode in a regular search query and still get accurate results.
Show Products with Restock Date (Pre-order)
When "Products in stock only" is enabled in the Product Search action settings, you can additionally enable "Show products with restock date". This allows the chatbot to include out-of-stock products that have an expected restock date set in PrestaShop. Instead of hiding these products entirely, the chatbot informs the customer about the restock date and that the product is available for pre-order.
Requirements:
- PrestaShop must have "Allow ordering of out-of-stock products" enabled (Shop Parameters > Product Settings)
- The webservice key must have View (GET) access to
combinationsandconfigurationsresources - Products must have an
available_dateset on their combinations in PrestaShop
Tax-Inclusive Prices
Enable the "Apply tax (VAT) to prices" toggle in the Product Search action settings to display prices with tax included. When enabled, the chatbot calculates prices using tax rules from your PrestaShop store based on the shop's default country. Compare the result with your storefront. Customer-specific tax rules, location, and checkout adjustments can still produce different totals.
Requirements:
- The webservice key must have View (GET) access to
taxes,tax_rules,tax_rule_groups, andconfigurationsresources
Specific Prices (Discounts and Promotions)
Enable the "Apply specific prices (discounts/promotions)" toggle in the Product Search action settings to display discounted prices from PrestaShop specific price rules. When a discount is active for a product, the chatbot shows both the discounted price and the original price, so customers can see the savings.
This covers universal specific price rules - promotions and sales that apply to all customers with a minimum quantity of 1. Time-limited promotions are also supported; the chatbot only applies discounts that are currently active based on their start and end dates.
Requirements:
- The webservice key must have View (GET) access to
specific_pricesandspecific_price_rulesresources
AI Product Search and the Shop Tab
For semantic product matching, review AI product search in Settings > Actions. On supported bots, connection setup can enable AI search instead of keyword search and start catalog indexing when auto-indexing is enabled and the required access and capacity are available. Older bots may require manual training. Review Shop > Products or Training > E-commerce catalog, wait for training to finish, and check errors before testing. Keyword-search options do not necessarily apply to AI search.
Testing Your Integration
After activating the actions, open Overview and try:
- "Show me running shoes" (tests product search)
- "I'm looking for product ABC-12345" (tests reference/SKU search)
- "What's the status of my order 12345?" (tests order details; supply the matching email for an order you are authorized to access)
Verify that the responses match data from your PrestaShop store, that product links open correctly, and that prices include tax and discounts when those options are enabled.
Install Chatbot on Your PrestaShop Store
To add the chat widget to your PrestaShop storefront, see the detailed guide: Installing Chatbot on a PrestaShop Store