Adding ChatLab to your website lets visitors interact with your AI chatbot directly on your site. This guide explains how to get the embed code and add it to your website.
Before you start
Create and train your chatbot before sharing it with customers. For installation, you also need permission to edit and publish the website. See How to create your first chatbot.
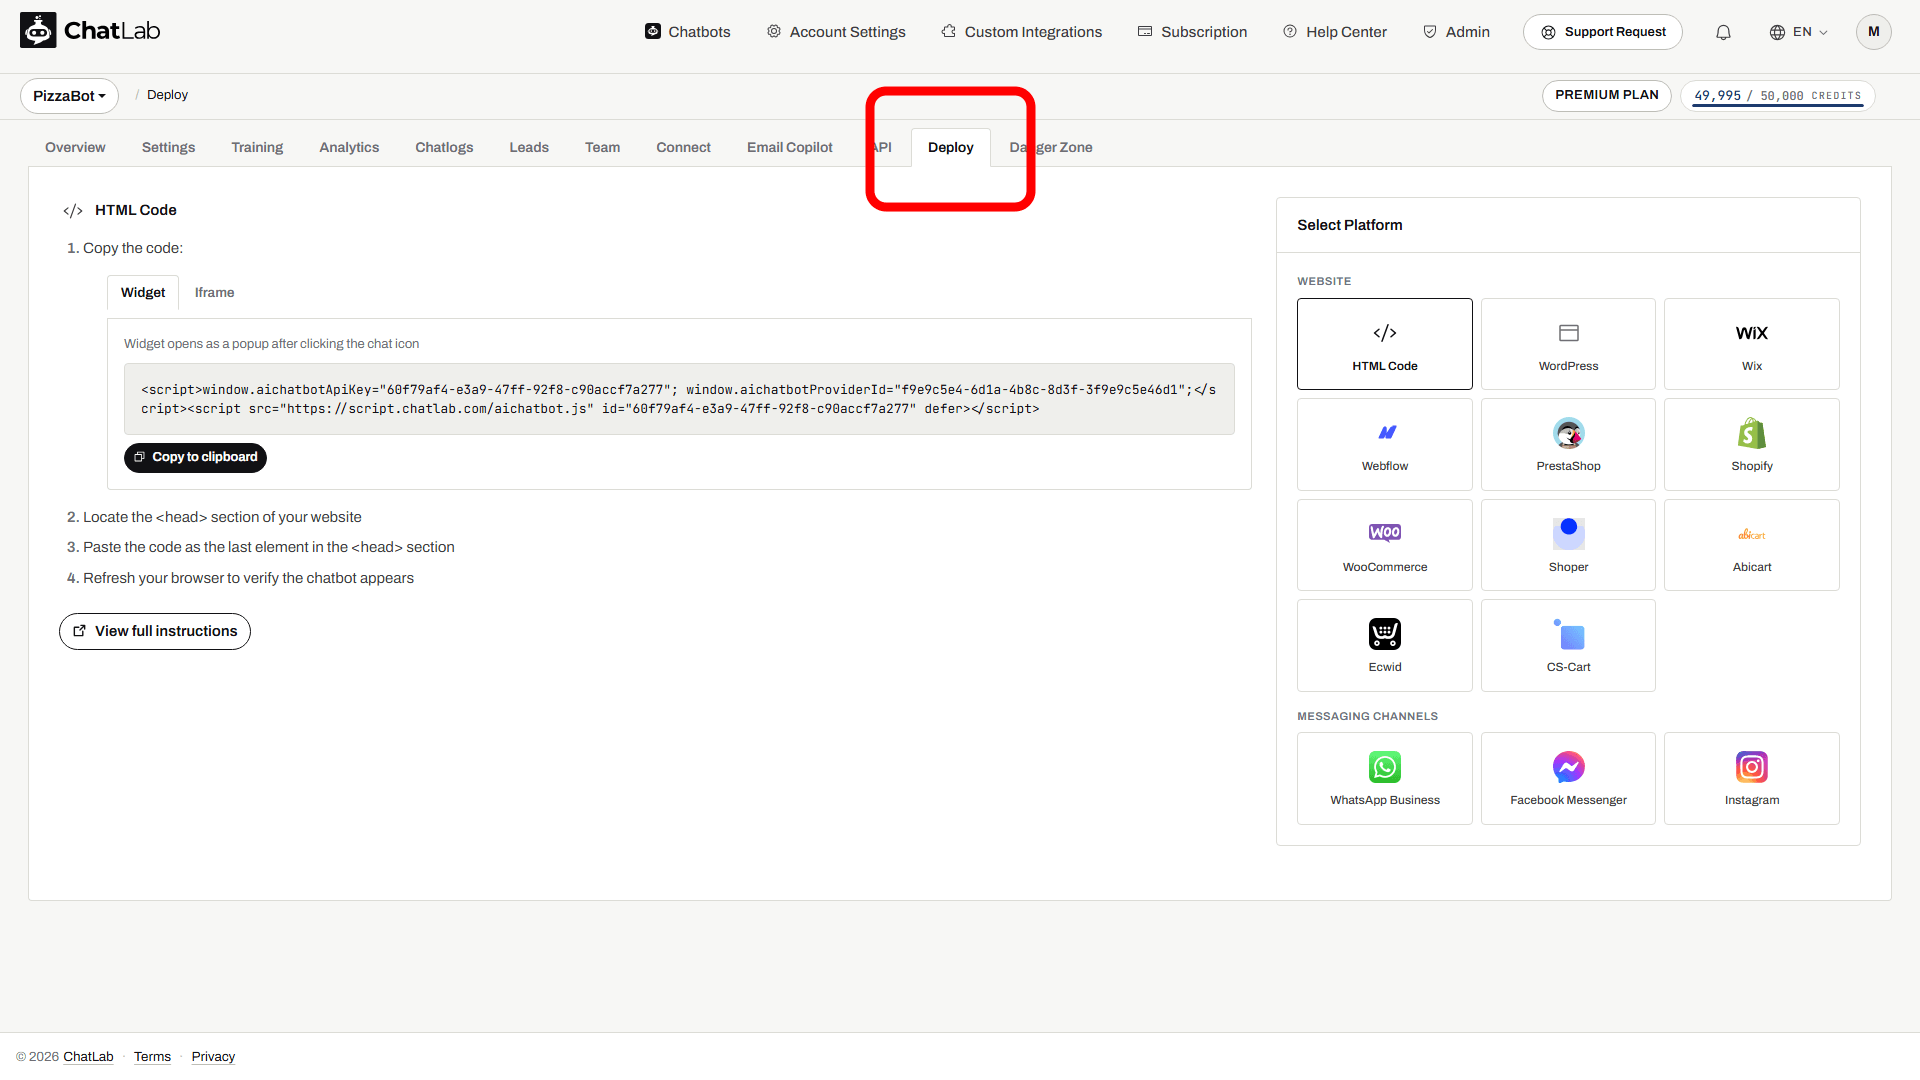
Opening the Deploy tab
Select your chatbot from the main dashboard, then click the Deploy tab.
Choosing your platform
The Select Platform panel on the right lists the supported destinations in two groups: Website, for placing the chatbot on pages you control, and Messaging channels, for connecting it to an existing conversation account. Click the entry that matches where you want the chatbot to appear to see tailored instructions.
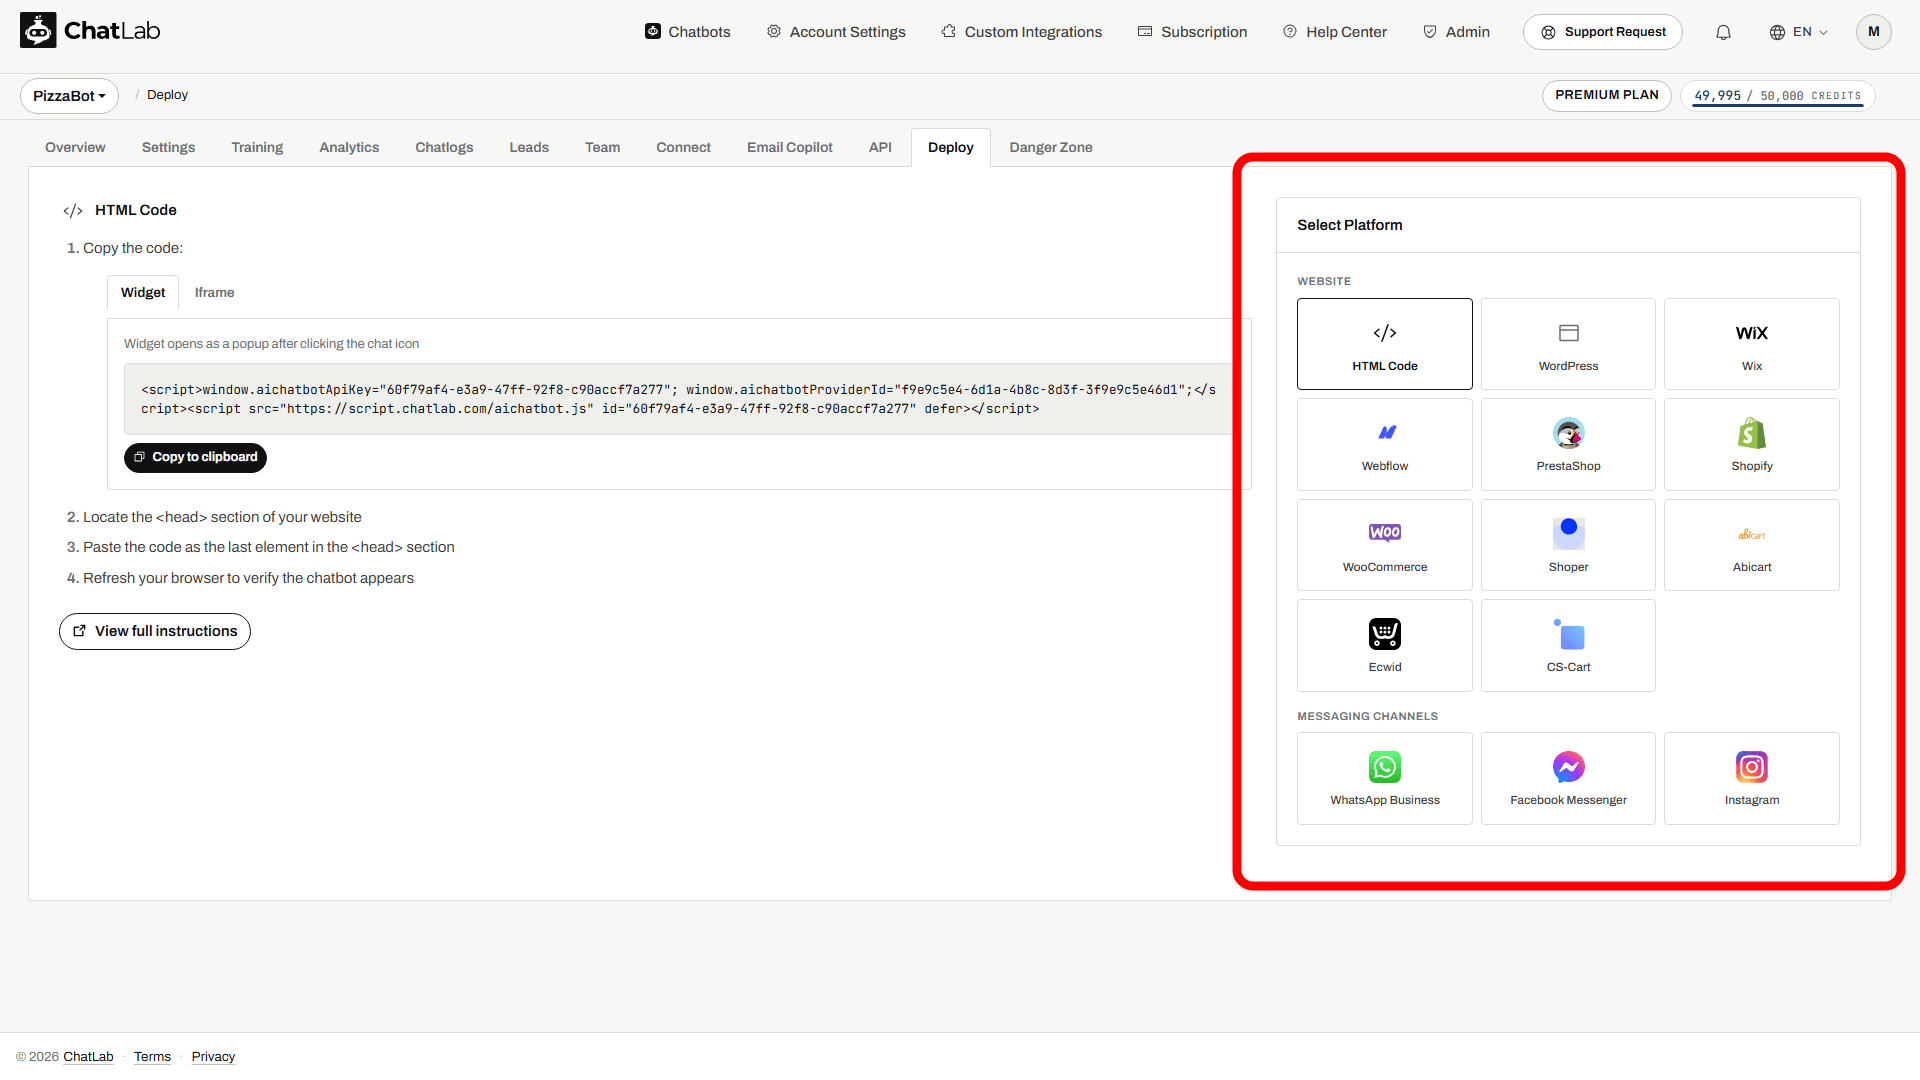
Supported platforms:
- HTML Code - works with any website where you can edit the HTML
- WordPress - via the official ChatLab plugin or manual code insertion
- Wix - via Settings > Custom Code
- Webflow - via Site settings > Custom code, with custom-code access enabled for your site or workspace
- PrestaShop - via the ChatLab PrestaShop module or manual code insertion
- Shopify - via the theme.liquid file
- WooCommerce - via the WordPress plugin or manual code insertion
- Shoper - via the ChatLab app from the Shoper App Store or manual code insertion
- Abicart - via Store design > Themes > Site header
- Ecwid - via Website > Overview > Custom JavaScript code
- CS-Cart - via Design > Layouts > Custom HTML code
Messaging channels:
- WhatsApp Business - replies in a WhatsApp Business account, see WhatsApp for Business
- Facebook Messenger - replies to your Facebook page's messages, see Integration with Facebook Messenger
- Instagram - replies to Instagram direct messages, see Integration with Instagram
Messaging channels do not use the embed code below. They are connected to an account you already own, so no code is pasted into a website.
Each platform shows step-by-step instructions specific to that integration. For platforms with dedicated help articles, a View full instructions link appears at the bottom.
Adding via HTML Code
The HTML Code option works with any website where you have access to the source code. You will see two embed options: Widget and Iframe.
Widget mode
The Widget tab shows the code that adds a chat icon to your website. When visitors click the icon, a chat popup opens.
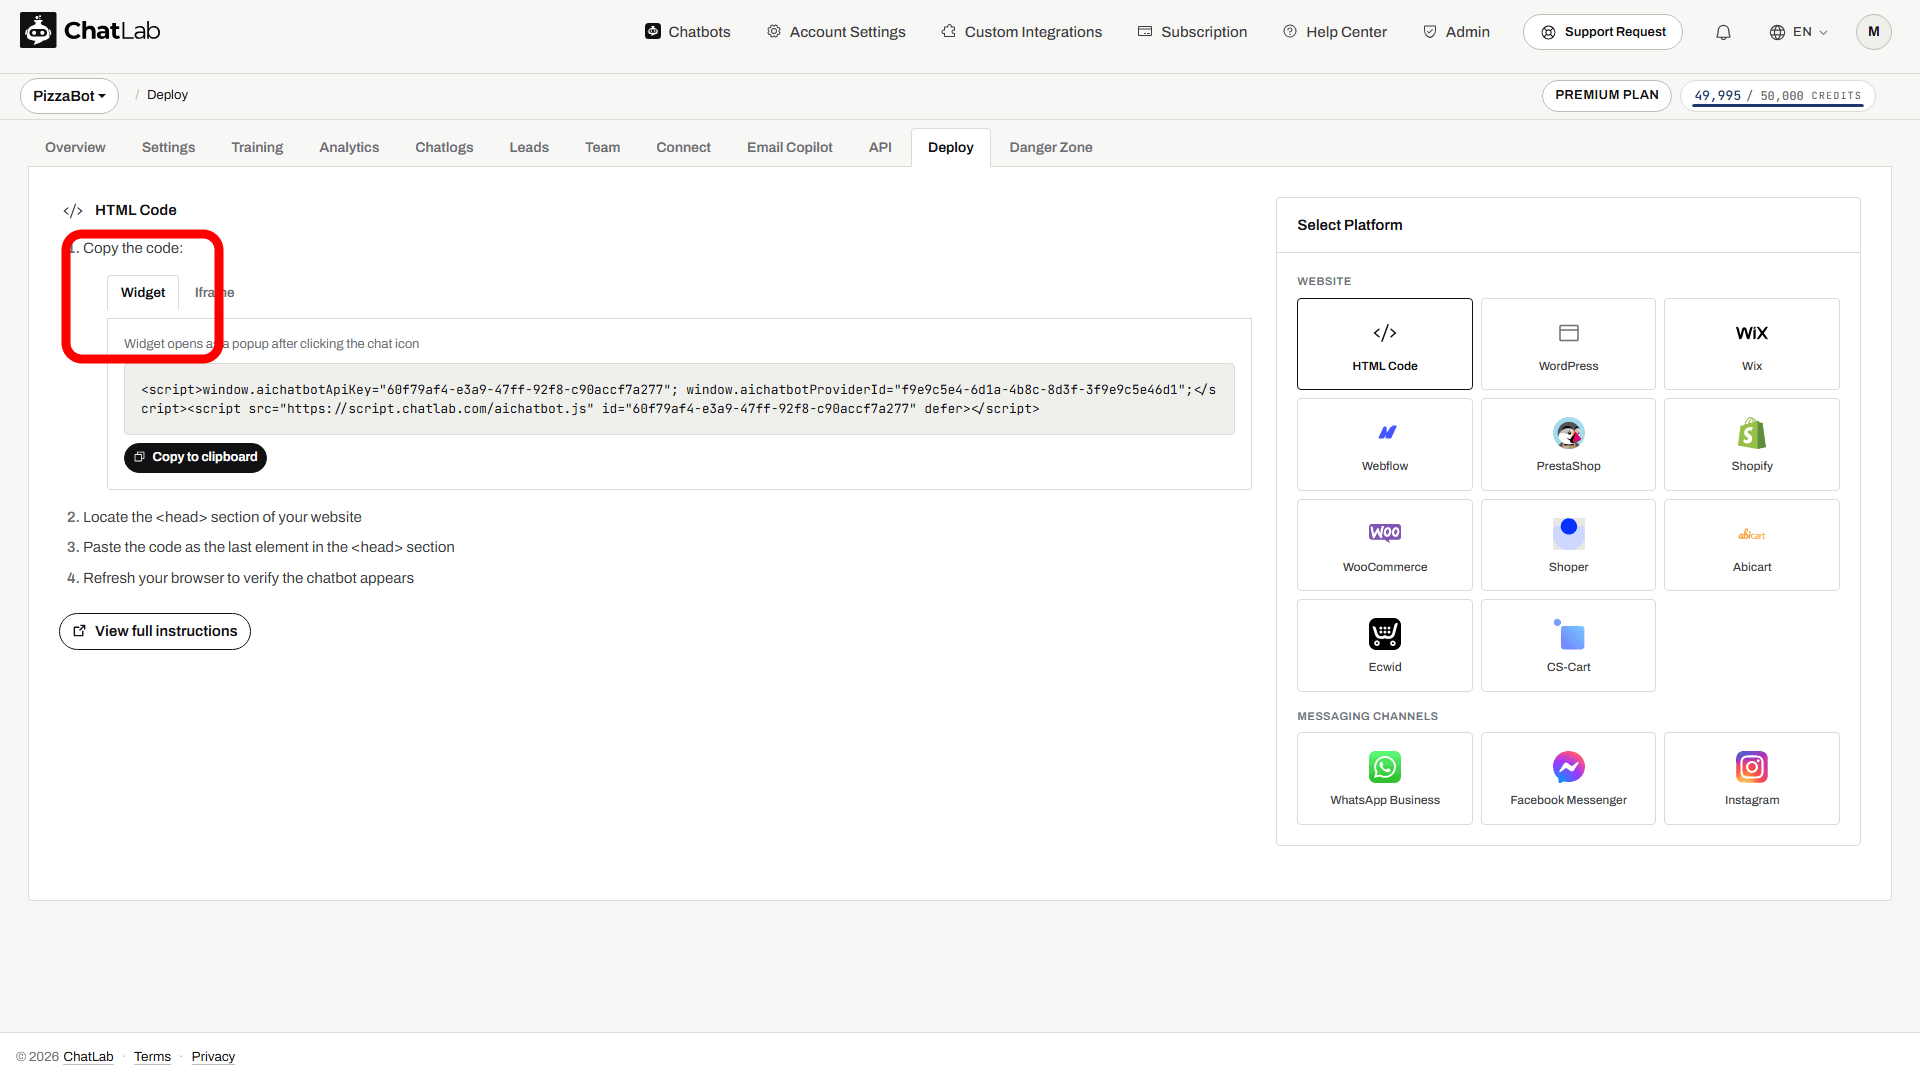
- Click the Widget tab
- Click Copy to clipboard to copy the code
- Locate the
<head>section of your website - Paste the code as the last element in the
<head>section - Refresh your browser to verify the chatbot icon appears
Iframe mode
The Iframe tab shows the code that embeds the chatbot directly into your page content. The chatbot is always visible and can be surrounded by other page elements.
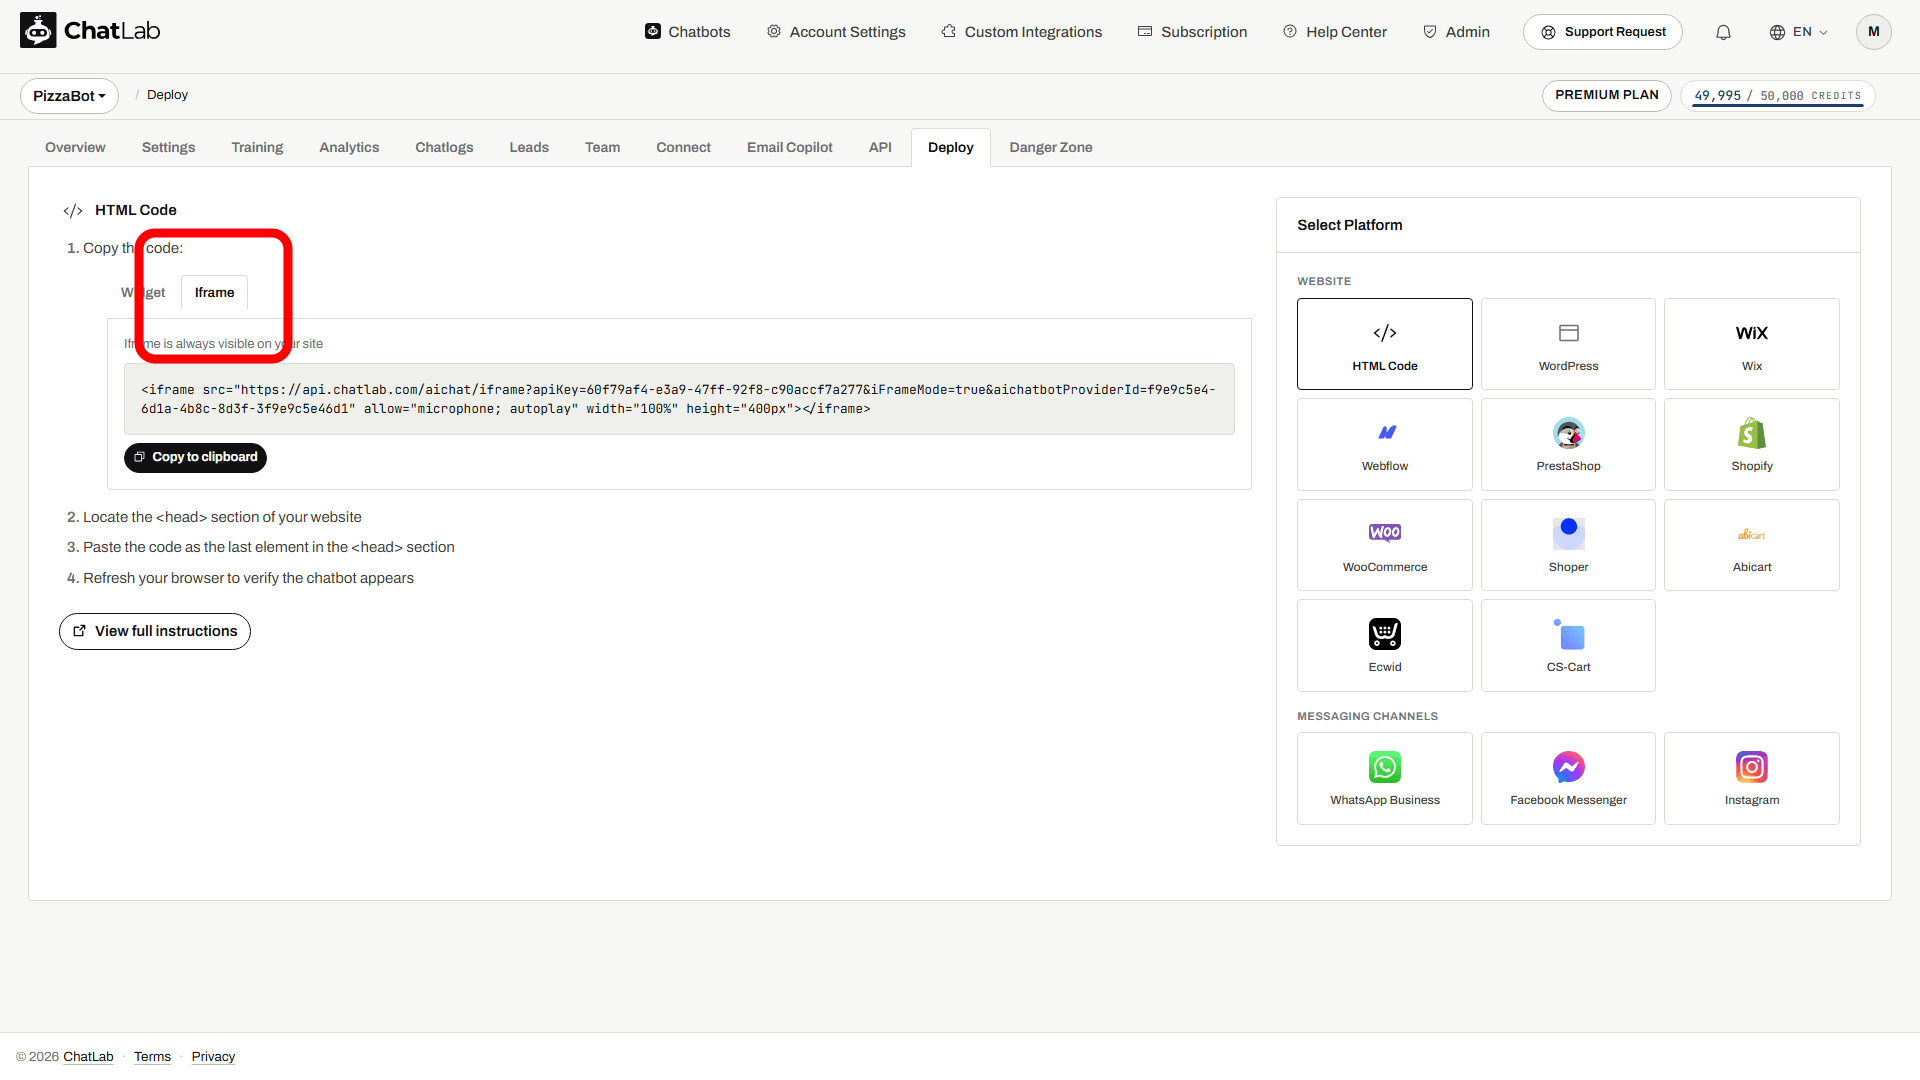
- Click the Iframe tab
- Click Copy to clipboard to copy the code
- Paste the code anywhere in your website's HTML where you want the chatbot to appear
- Adjust the
widthandheightattributes to fit your layout
Not sure which to choose? Read What is the difference between widget and Iframe? for a detailed comparison.
Adding via a plugin or app: WordPress, PrestaShop, WooCommerce and Shoper
For these four platforms ChatLab offers its own plugin, module or app. Once you connect it to your chatbot, it adds the chatbot to your site by itself, so there is no code to copy. For online stores it also connects the store, so the chatbot can search your products and check order status. Pasting the code manually is still possible as an alternative, but it only shows the chat widget.
When you select one of these platforms, two tabs appear: Plugin Installation (recommended) and Manual Installation.
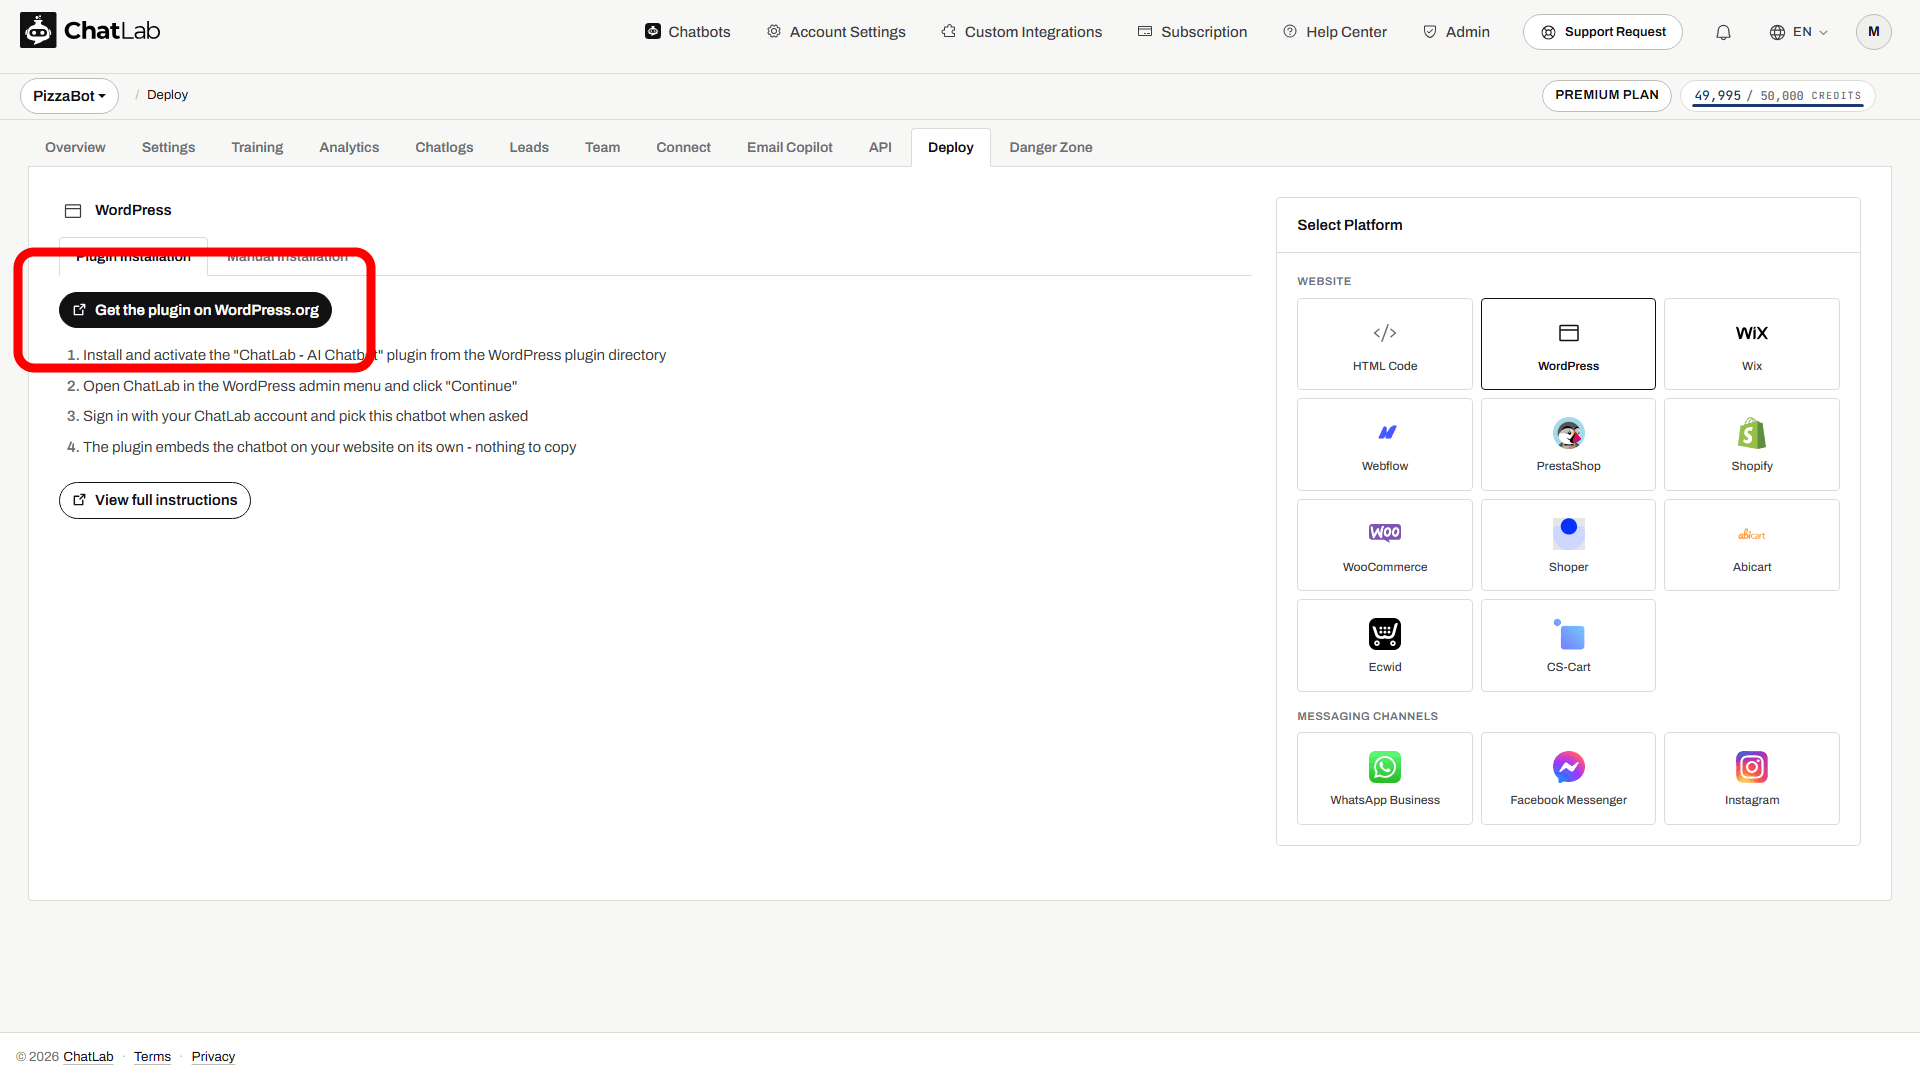
Plugin Installation (recommended)
- Click the button at the top of the Plugin Installation tab: Get the plugin on WordPress.org for WordPress and WooCommerce, Download the ChatLab module (.zip) for PrestaShop, or Get the app in the Shoper App Store for Shoper. The PrestaShop button does not open a marketplace page - it downloads the module to your computer as a single ZIP file (
chatlab.zip), which you upload to your store in the next step. - Install the ChatLab plugin, module or app in your website's admin panel. For PrestaShop, open Modules > Module Manager > Upload a module in your PrestaShop back office and pick the downloaded ZIP file. The full PrestaShop walkthrough is in How to add chatbot to PrestaShop.
- Open ChatLab there, sign in with your ChatLab account and pick this chatbot when asked. For PrestaShop, click Configure on the installed module, then Connect my store. For a WooCommerce store, keep WooCommerce integration ticked so the store data is connected too.
- The connection finishes automatically and the chatbot appears on your website. Open your site and send a test message.
Each platform has a dedicated guide with every step and screenshot:
- WordPress - How to add your chatbot to WordPress website
- PrestaShop - How to add chatbot to PrestaShop
- WooCommerce - Integration with WooCommerce
- Shoper - Integration with Shoper
Shoper
Select Shoper in the Select Platform panel. On the Plugin Installation tab, click Get the app in the Shoper App Store to open the free ChatLab app in the Shoper App Store.
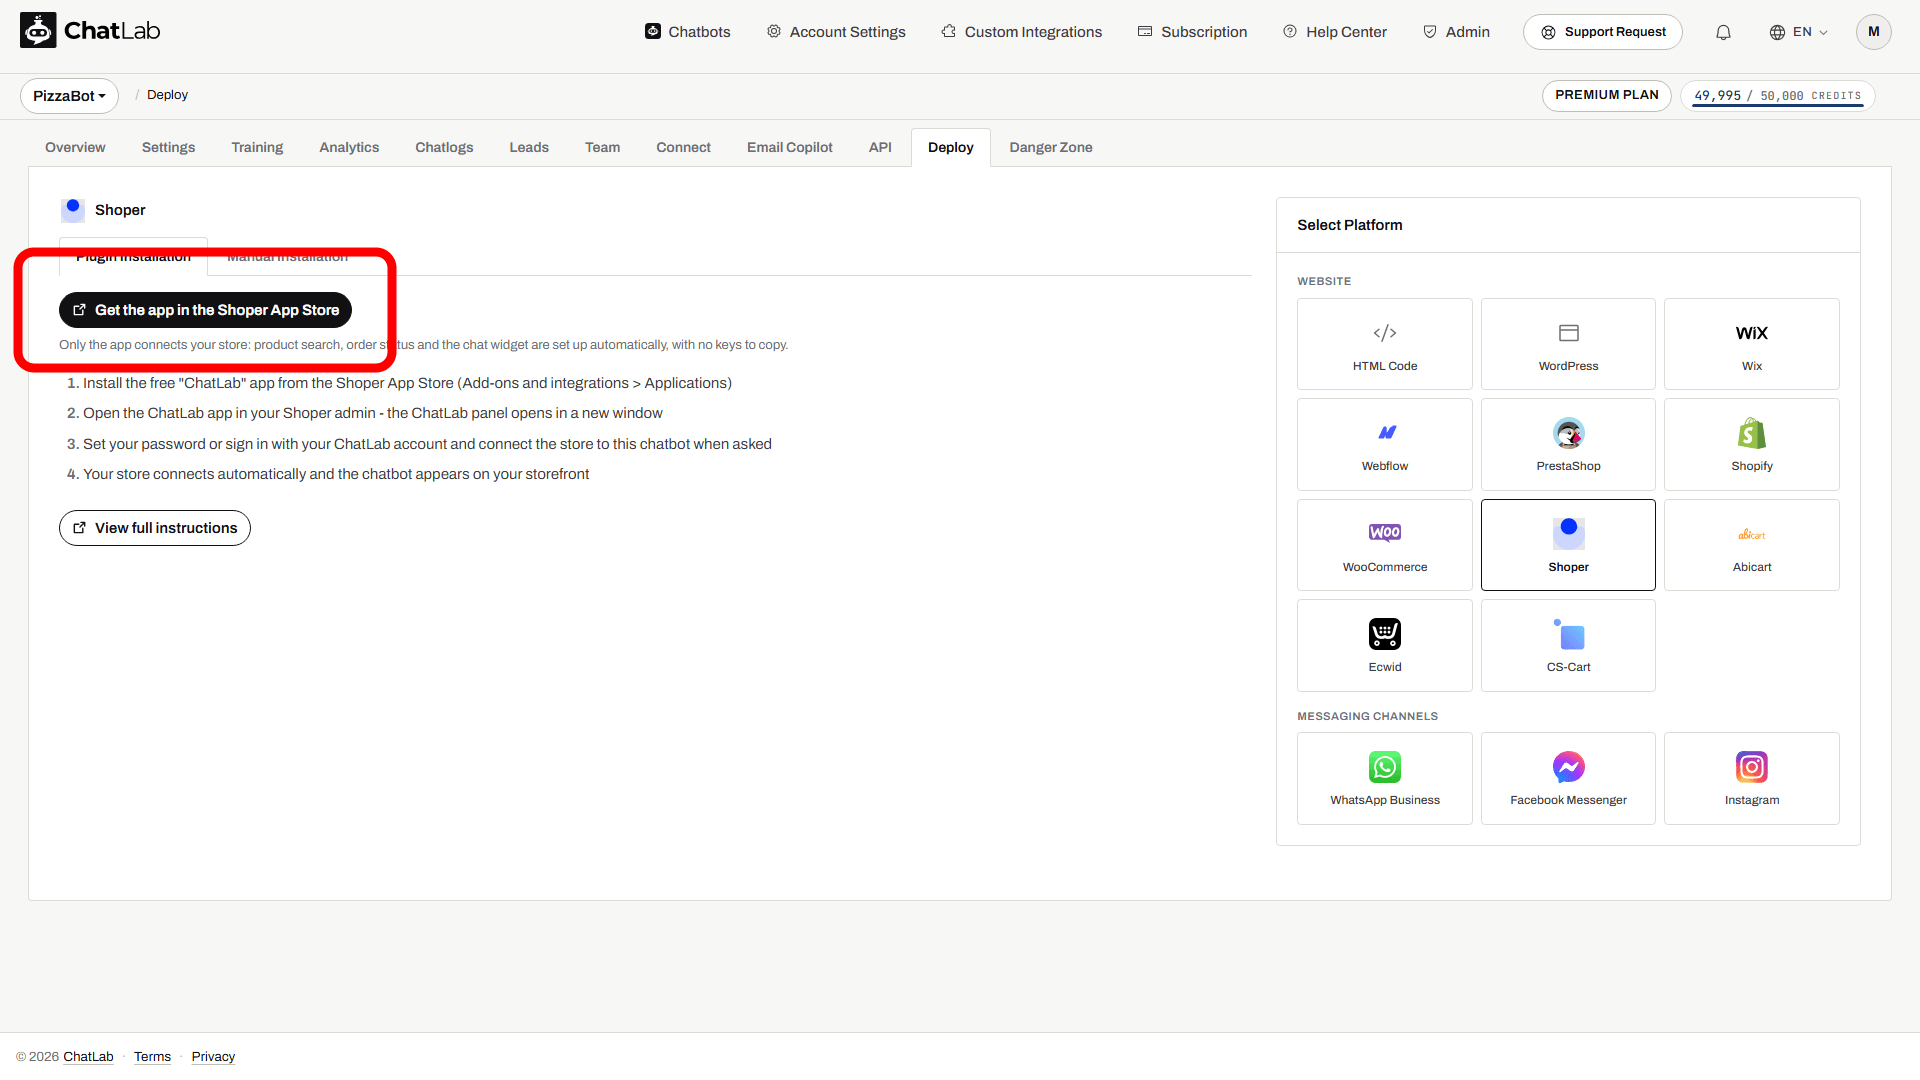
- Install the free ChatLab app from the Shoper App Store. You can also find it from your Shoper admin under Add-ons and integrations > Applications.
- Open the ChatLab app in your Shoper admin. The ChatLab panel opens in a new window.
- Set your password, or sign in with your ChatLab account, and connect the store to this chatbot when asked.
- Your store connects automatically and the chatbot appears on your storefront.
To add only the chat widget without the app, switch to Manual Installation, copy the code, then in your Shoper admin go to Add-ons and integrations > Custom integrations, paste the code into the Page header field and save. Refresh your store to check that the chatbot appears. For the full walkthrough, see Integration with Shoper.
Manual Installation
Switch to Manual Installation, copy the code and paste it into your site's header following the steps shown for your platform. For WordPress and WooCommerce this is done with a code insertion plugin such as Insert Headers and Footers. Publish your changes and test the chat. Install the chatbot once only, using either the plugin or app or the manual code, not both.
Adding via other platforms
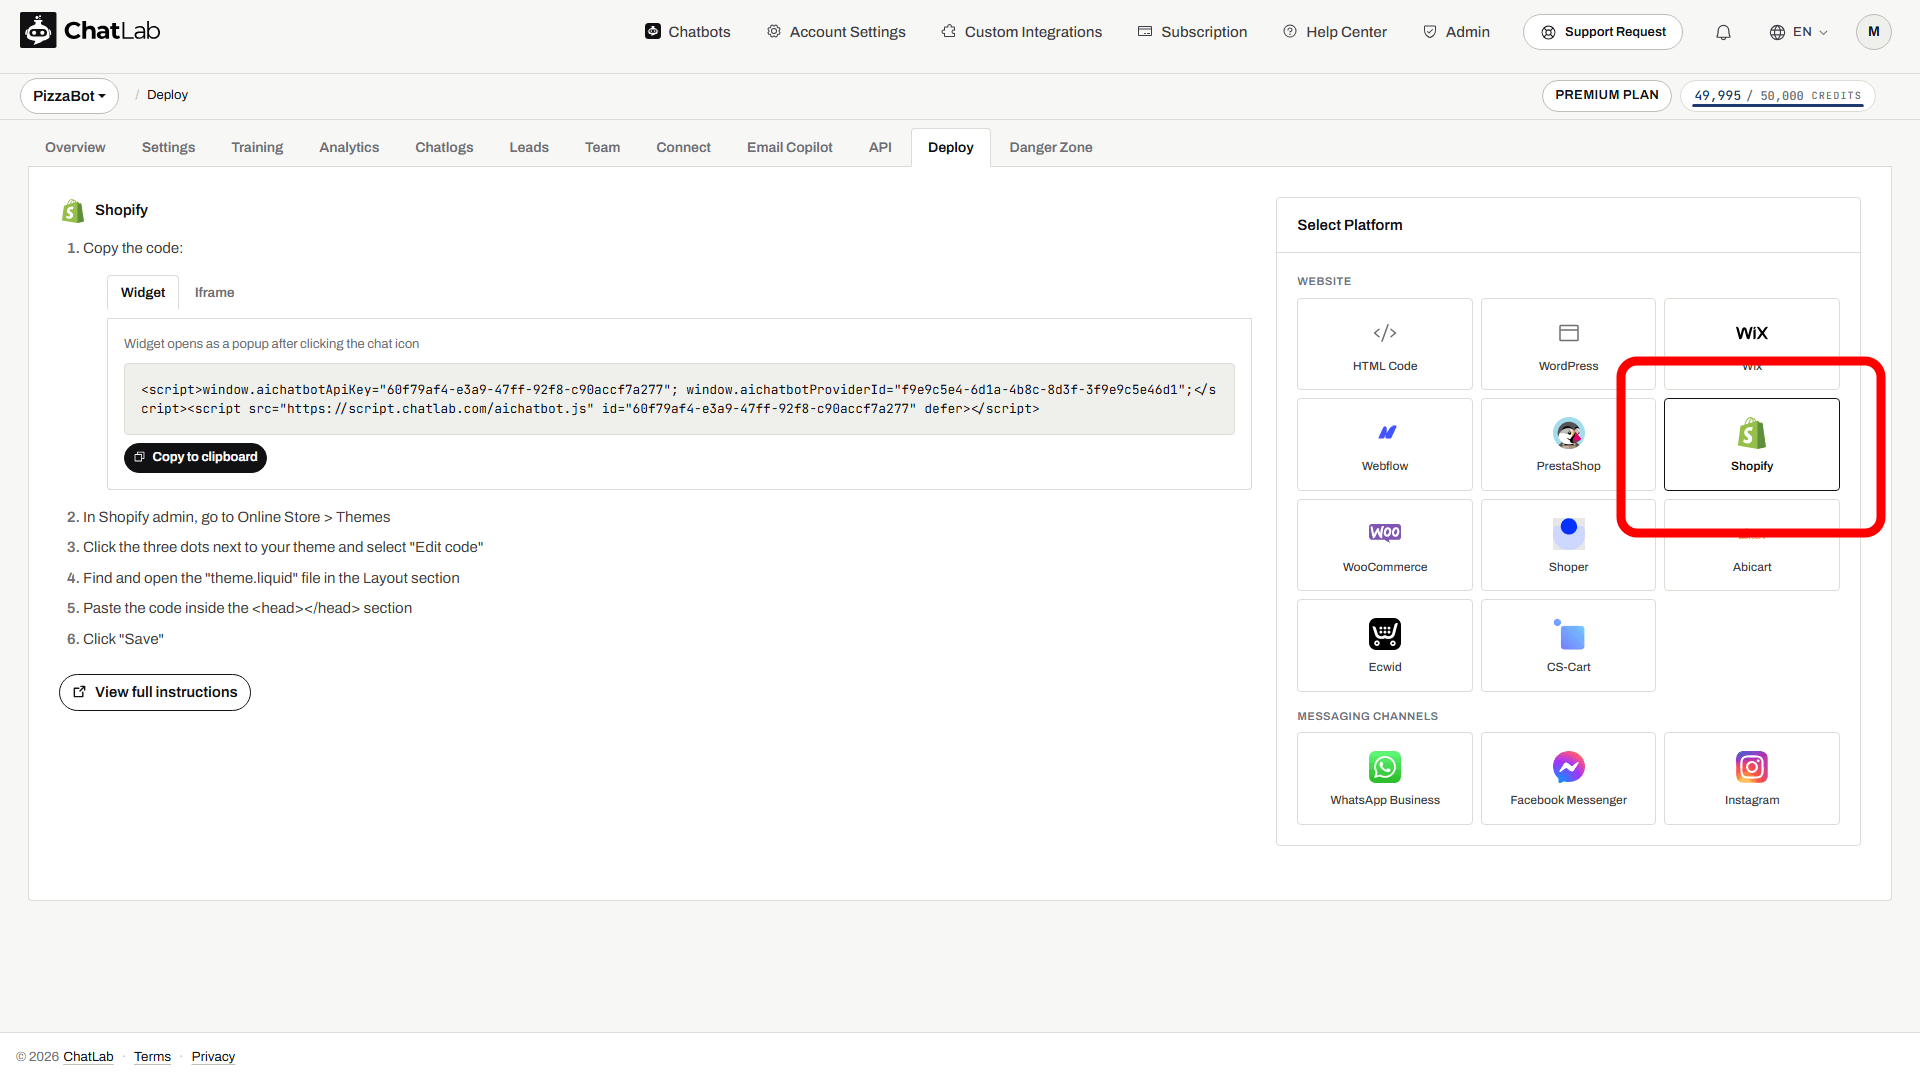
For Wix, Webflow, Shopify, Abicart, Ecwid and CS-Cart, there is no plugin to install: you paste the code into your site yourself. Select the platform in the Select Platform panel to see:
- The embed code with Widget and Iframe options
- Platform-specific, step-by-step paste instructions
- A View full instructions link to the full platform guide
Full guides for these platforms:
- How to add your chatbot to Wix website
- How to add your chatbot to Webflow website
- Integration with Shopify
- Integration with Abicart
- Integration with Ecwid
- Integration with CS-Cart
GDPR compliance
If you need your chatbot to load only after cookie consent is granted, see Setting up ChatLab for GDPR compliance for integration guides covering CookieBot, Usercentrics, and Google Tag Manager.
Content Security Policy (CSP)
If your website uses Content Security Policy headers, you need to allow ChatLab domains for the chatbot to work. The required directives depend on whether you use Widget or Iframe mode.
Widget mode
The widget loads a script on your page that creates the chat interface. Merge the following ChatLab origins into your existing CSP directives; do not replace the policy for the rest of your website:
script-src https://script.chatlab.com;
style-src https://script.chatlab.com https://fonts.googleapis.com 'unsafe-inline';
connect-src https://api.chatlab.com wss://api.chatlab.com;
font-src https://fonts.gstatic.com;
By default, the widget injects some styles inline. Your policy also needs to authorize the inline configuration script, for example with a CSP nonce or hash. Permit the image origins used by your bot and product cards in img-src; audio and other enabled features may need further origins. For an agency domain, use the domains from your generated snippet.
CSP Safe Mode - avoiding unsafe-inline
If your website security policy does not allow 'unsafe-inline' in style-src, you can enable CSP Safe Mode. This loads the widget's container stylesheet from an external CSS file. It does not authorize your inline configuration script or guarantee that every custom style and enabled feature meets your policy.
To enable it, add window.aichatbotCspSafe = true; before the ChatLab script tag:
<script>
  window.aichatbotApiKey = "YOUR_API_KEY";
  window.aichatbotCspSafe = true;
</script>
<script src="https://script.chatlab.com/aichatbot.js" defer></script>
With CSP Safe Mode enabled, test a stylesheet policy without 'unsafe-inline'. A starting point is:
script-src https://script.chatlab.com;
style-src https://script.chatlab.com https://fonts.googleapis.com;
connect-src https://api.chatlab.com wss://api.chatlab.com;
font-src https://fonts.gstatic.com;
Iframe mode
The parent page must allow the origin in the copied iframe URL. For standard ChatLab hosting, add this to the existing policy:
frame-src https://api.chatlab.com;