The Human Support Contact Form gives your website visitors a way to reach your support team directly from the chat widget. When a visitor submits the form, an email with their message and (optionally) the conversation transcript is sent to your support email address. You can also ask visitors for an optional phone number, so your team can call back when that is faster than email.
Where to find the settings
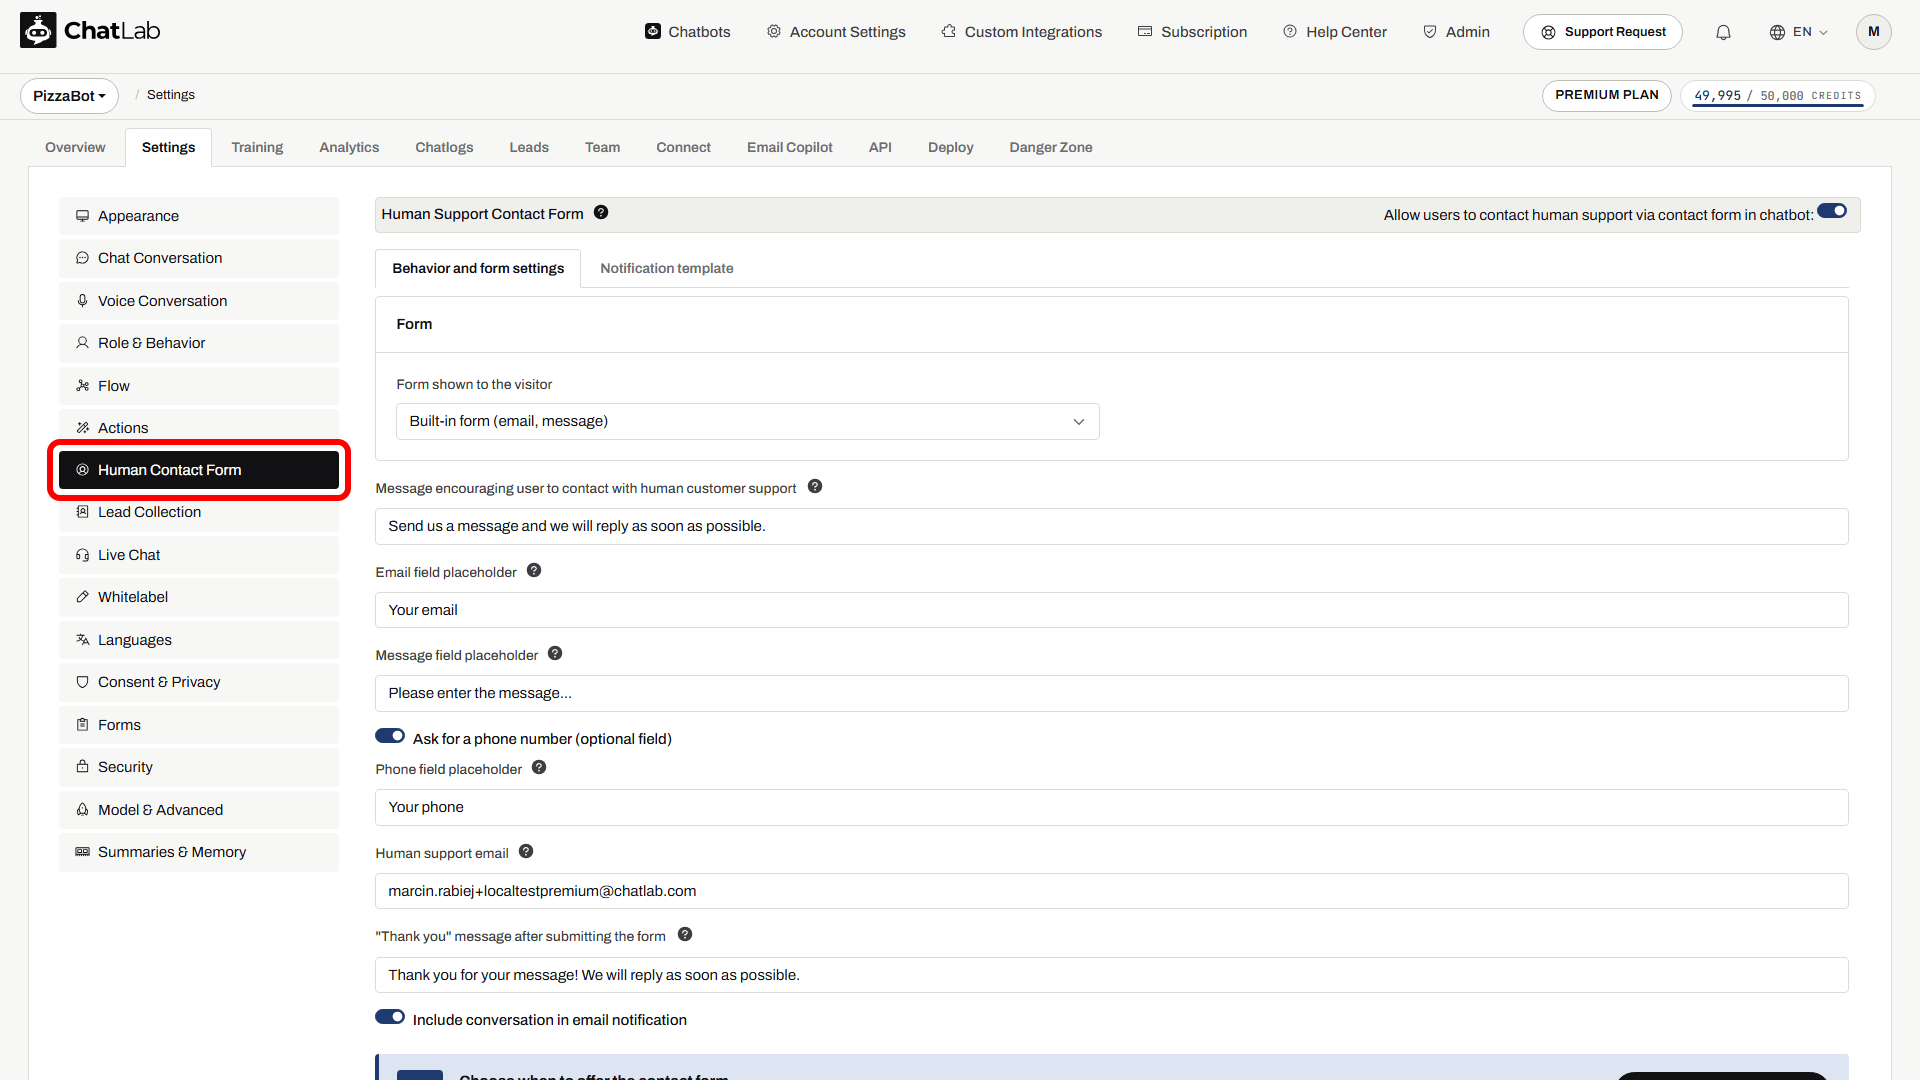
Select your chatbot, then navigate to Settings > Human Contact Form. If you do not have a chatbot yet, see How to create your first chatbot.
Enable the contact form
Toggle on Allow users to contact human support via contact form in chatbot at the top of the page. When enabled, two sub-tabs appear below: Behavior and form settings and Notification template.
Changes are saved automatically - wait for the Saved confirmation before you leave the page.
Behavior and form settings
This is the first sub-tab. It controls which form visitors see and the text around it.
Choose the form shown to the visitor
At the top of the tab, use the Form shown to the visitor dropdown to decide what visitors fill in:
- Built-in form (email, message) - the standard form with an email field and a message field, plus an optional phone field if you turn it on (see below). Use the settings below to customize its placeholders and messages.
- Custom form - a form you designed under Settings > Forms. Only forms containing an Email field are listed. The first Email field identifies the sender and the first Long answer field supplies the message. See Custom forms for how to build one.
Built-in form settings
When the built-in form is selected, configure the following:
- Message encouraging user to contact with human customer support - the text displayed at the top of the contact form. Supports markdown for links.
- Email field placeholder - the hint text shown inside the email field before the visitor types (for example "Your email").
- Message field placeholder - the hint text shown inside the message field (for example "Please enter the message...").
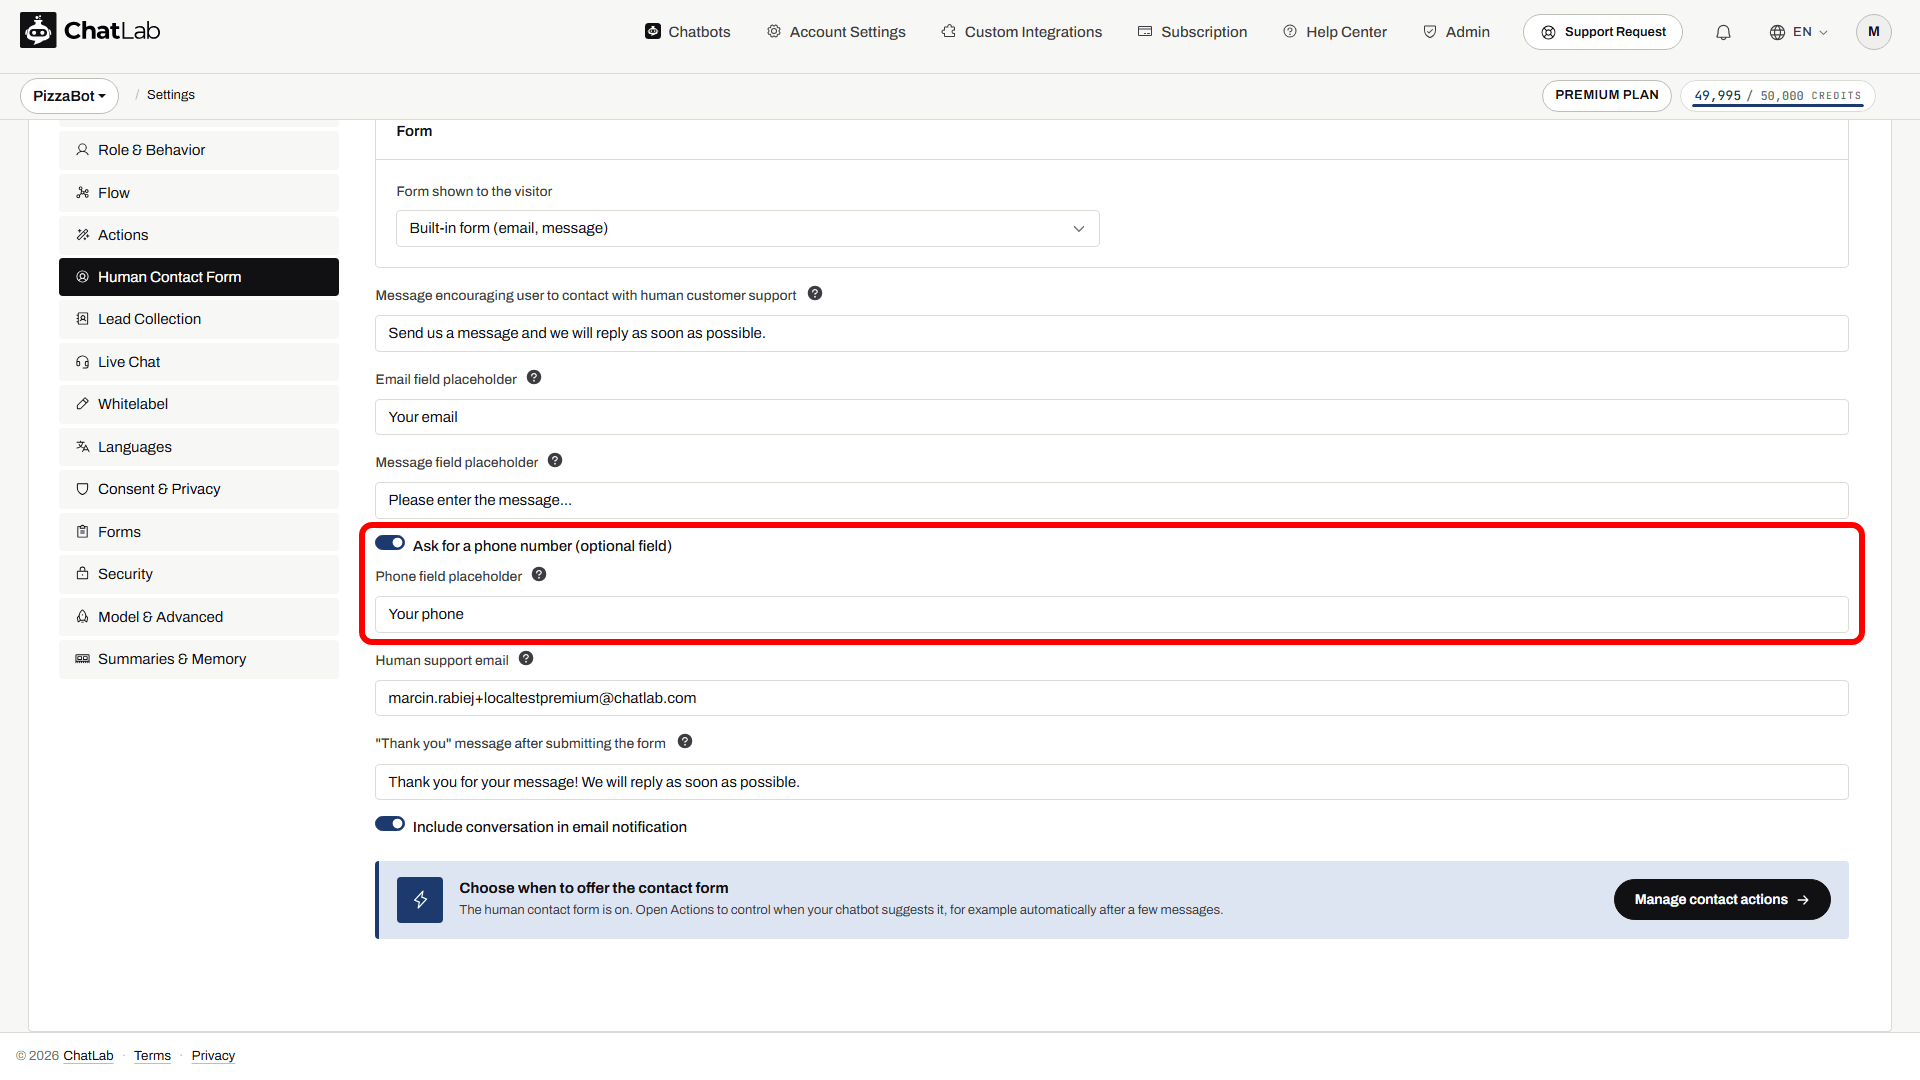
- Ask for a phone number (optional field) - adds a phone field to the form. Off by default. See Ask visitors for a phone number.
- Human support email - the address where form submissions are sent. You can enter multiple email addresses separated by commas.
- "Thank you" message after submitting the form - the confirmation message displayed after the visitor submits. Supports markdown.
- Include conversation in email notification - when enabled, the full conversation transcript is included in the email sent to your support address.
Ask visitors for a phone number
Some visitors prefer a phone call to an email reply - for example when booking a table, ordering for an event or sorting out an urgent problem. The built-in form can include an optional phone field for them.
- Select your chatbot and navigate to Settings > Human Contact Form.
- Stay on the Behavior and form settings sub-tab and turn on Ask for a phone number (optional field).
- Optionally edit Phone field placeholder - the hint text shown inside the phone field. The default is "Your phone", up to 40 characters.
- Open the Notification template sub-tab and click the
##USER_PHONE##chip so the number appears in the notification email (see Notification template). - Wait for Saved.
How the phone field works:
- It is optional for the visitor. The form can be sent with the phone field empty.
- Only valid numbers are accepted. A number may contain digits, spaces and the characters
+ ( ) - . /, up to 15 characters. If the visitor types something else, the form shows "Please provide valid phone number" and is not sent until the number is corrected or removed. - It is available for the built-in form only. When a custom form is selected in Form shown to the visitor, the switch is hidden - add a Phone field to the custom form instead.
- Existing chatbots are not affected. The field stays hidden until you turn it on.
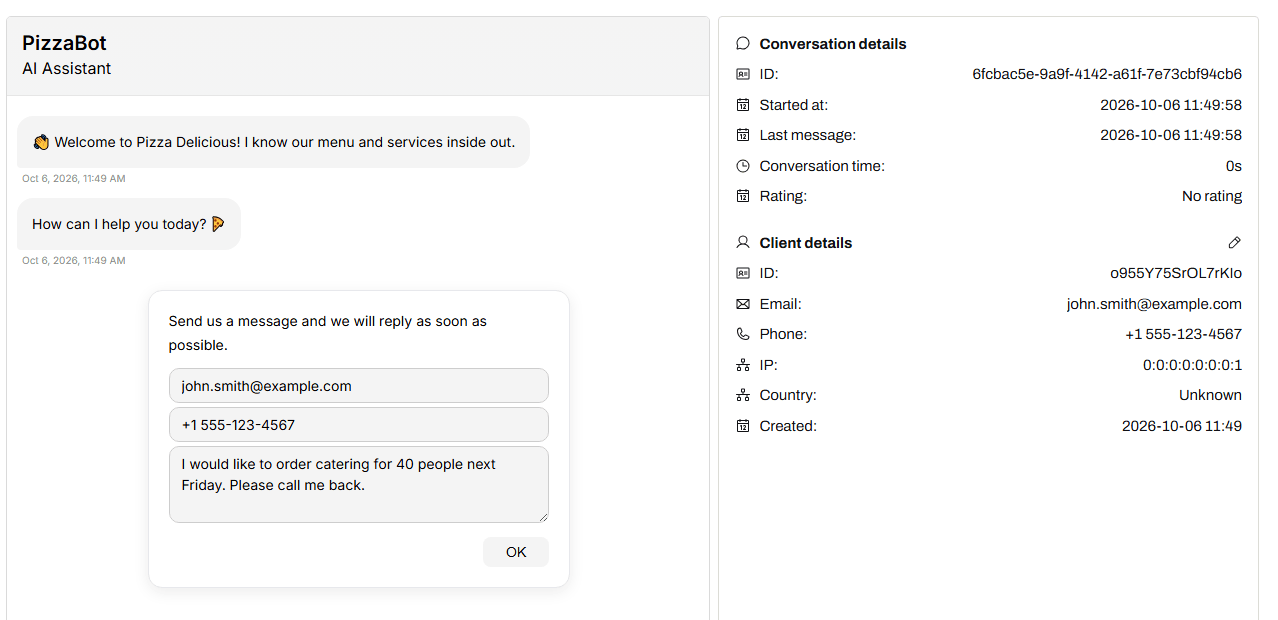
When a visitor submits a phone number, ChatLab uses it in several places:
- Notification email - wherever you put the
##USER_PHONE##placeholder in the email subject or content. - Client details - the number is saved on the visitor's contact profile, so it shows under Client details in Chatlogs and with the contact in Leads.
- Chat logs - the submitted form, including the phone number, is replayed in the conversation in Chatlogs.
- Daily summary email - the number is listed in the "Human support requests" section of the daily summary email.
- Webhooks - the
contact_form.submittedevent includes the number in thephonefield. See Webhooks.
If you create your chatbot with the setup wizard, the wizard may turn the phone field on and suggest a placeholder in your website's language when your website clearly relies on phone contact (for example a restaurant, clinic or hotel). You can change this at any time in the settings above.
Notification template
Click the Notification template sub-tab to customize the email your support team receives when a visitor submits the form.
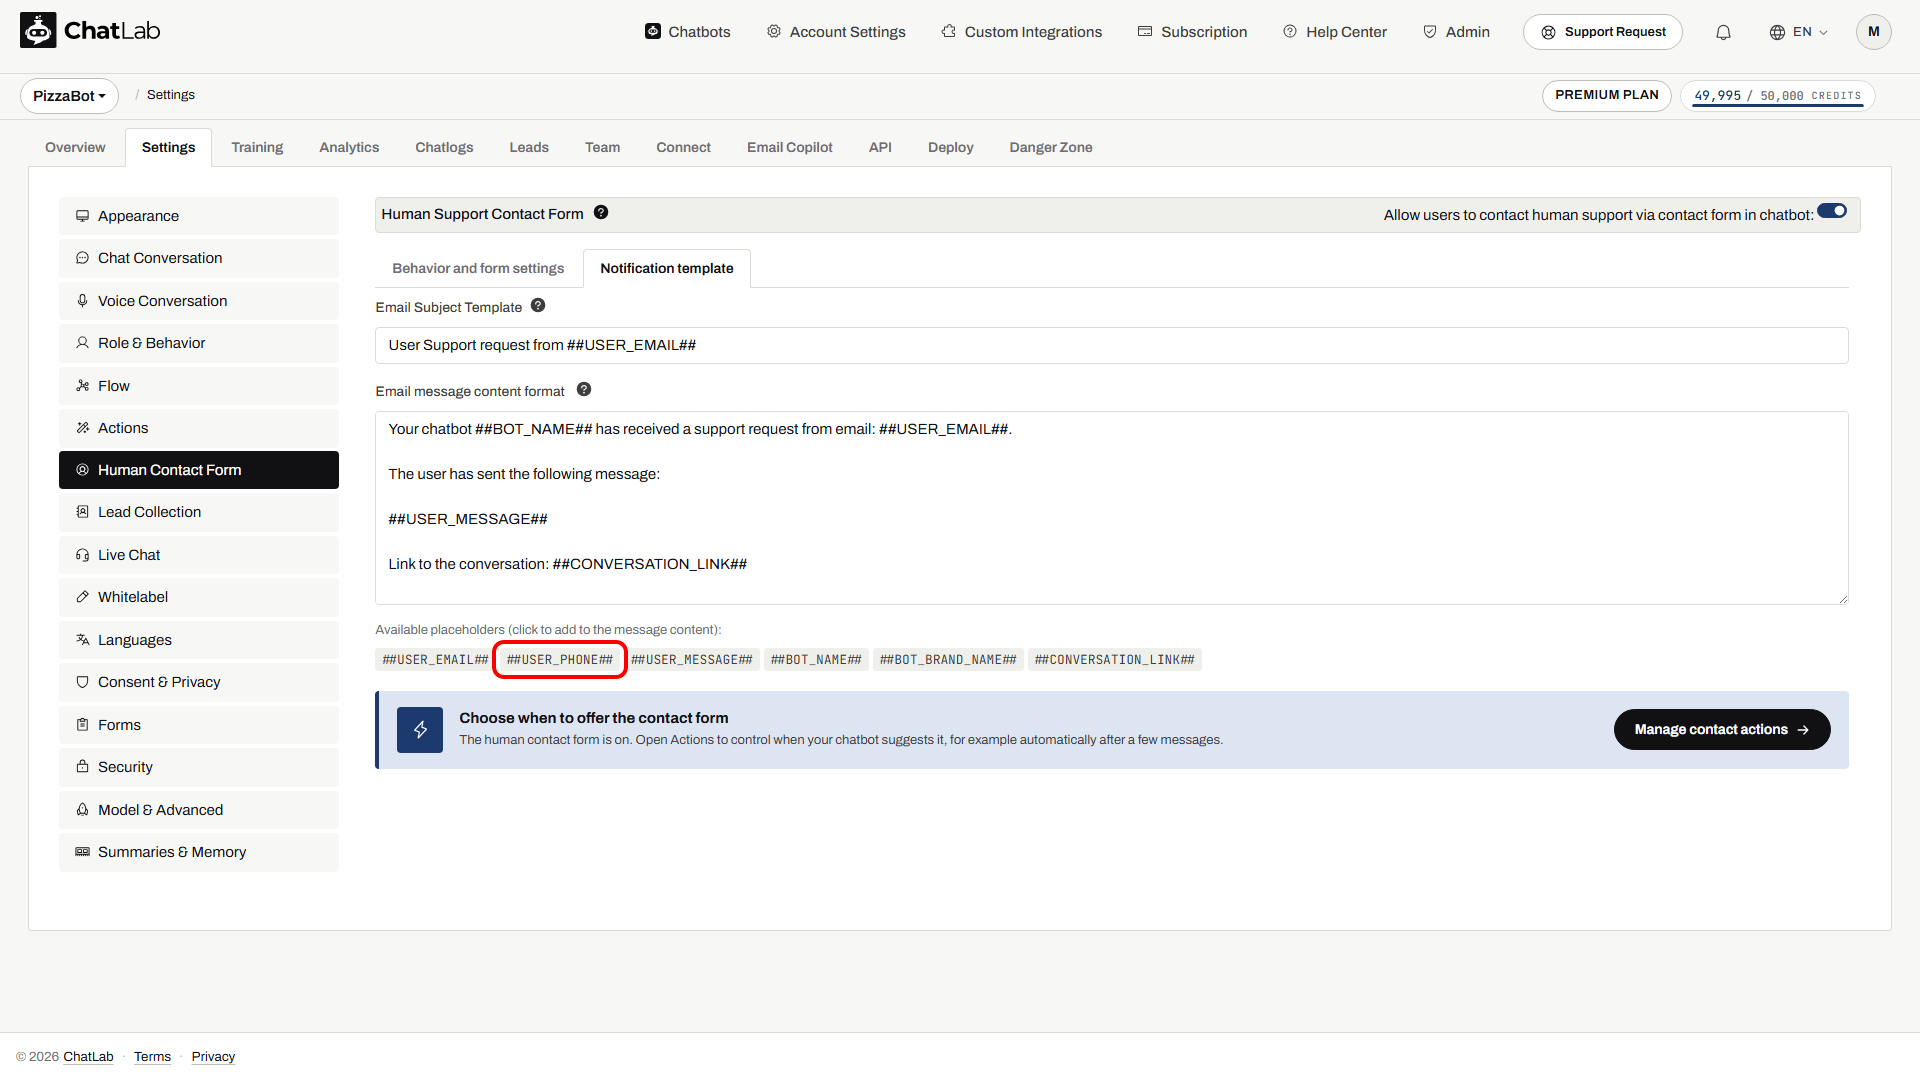
- Email Subject Template - the subject line of the notification email.
- Email message content format - the body of the notification email.
Placeholders are tokens such as ##USER_EMAIL## that ChatLab replaces with real values when it sends the email. Below the content field is a row of Available placeholders. These are clickable chips - click a chip to add its placeholder to the end of the email content, so you do not have to type the exact token. To use a placeholder in the subject, type it into the subject field.
##USER_EMAIL##- the visitor's email address##USER_PHONE##- the visitor's phone number. The chip appears only when Ask for a phone number (optional field) is on. If the visitor leaves the phone field empty, the placeholder is replaced with nothing.##USER_MESSAGE##- the message the visitor typed##BOT_NAME##- the chatbot's name##BOT_BRAND_NAME##- your brand name (e.g. "ChatLab")##CONVERSATION_LINK##- a direct link to the conversation in your Chatlogs
The email content pre-filled for your chatbot does not include ##USER_PHONE##. If you turn on the phone field, add the placeholder yourself - otherwise the phone number is saved in ChatLab but does not appear in the email.
When a custom form is selected, the email, phone and message chips are replaced with one ##FIELD:...## chip for each field of that form.
When the form appears to visitors
There are three ways the contact form can appear in the chat widget:
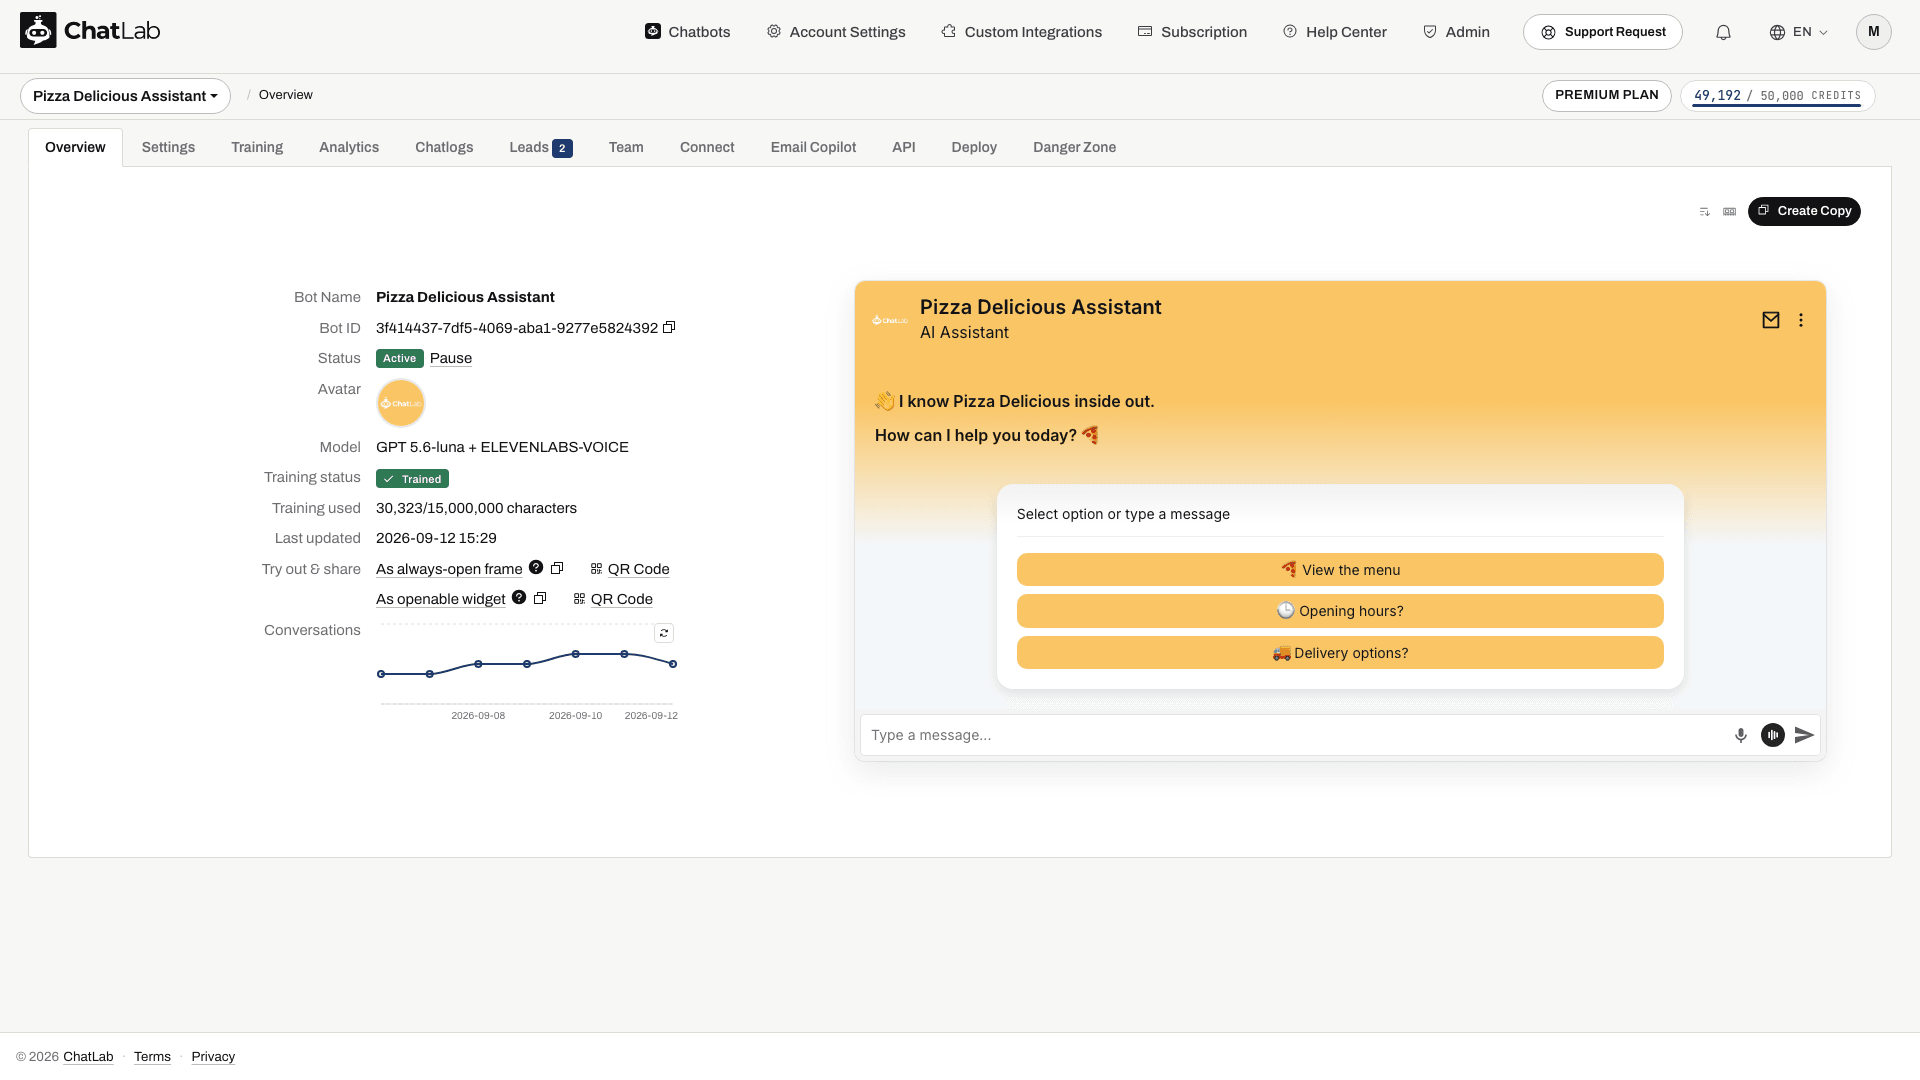
- From the chat header - when the contact form is enabled, visitors can open it at any time from the widget header. With the Separate icons layout it is an envelope icon; with the Menu (dropdown) layout it is the Open contact form entry in the header menu. The layout is set in Settings > Appearance > Header Actions. If the Special Welcome Screen is enabled, the Hide Human Contact Form option decides whether it is reachable before the visitor's first message.
-
AI-driven trigger - the chatbot automatically detects when a visitor needs human help (for example, when it cannot answer a question or when the visitor explicitly asks) and displays the form. This is configured in Settings > Actions.
-
After X messages - the form appears automatically after a set number of messages in the conversation. This is also configured in Settings > Actions.
AI-powered actions for human support
To configure automatic triggers, navigate to Settings > Actions and filter by Human Support.
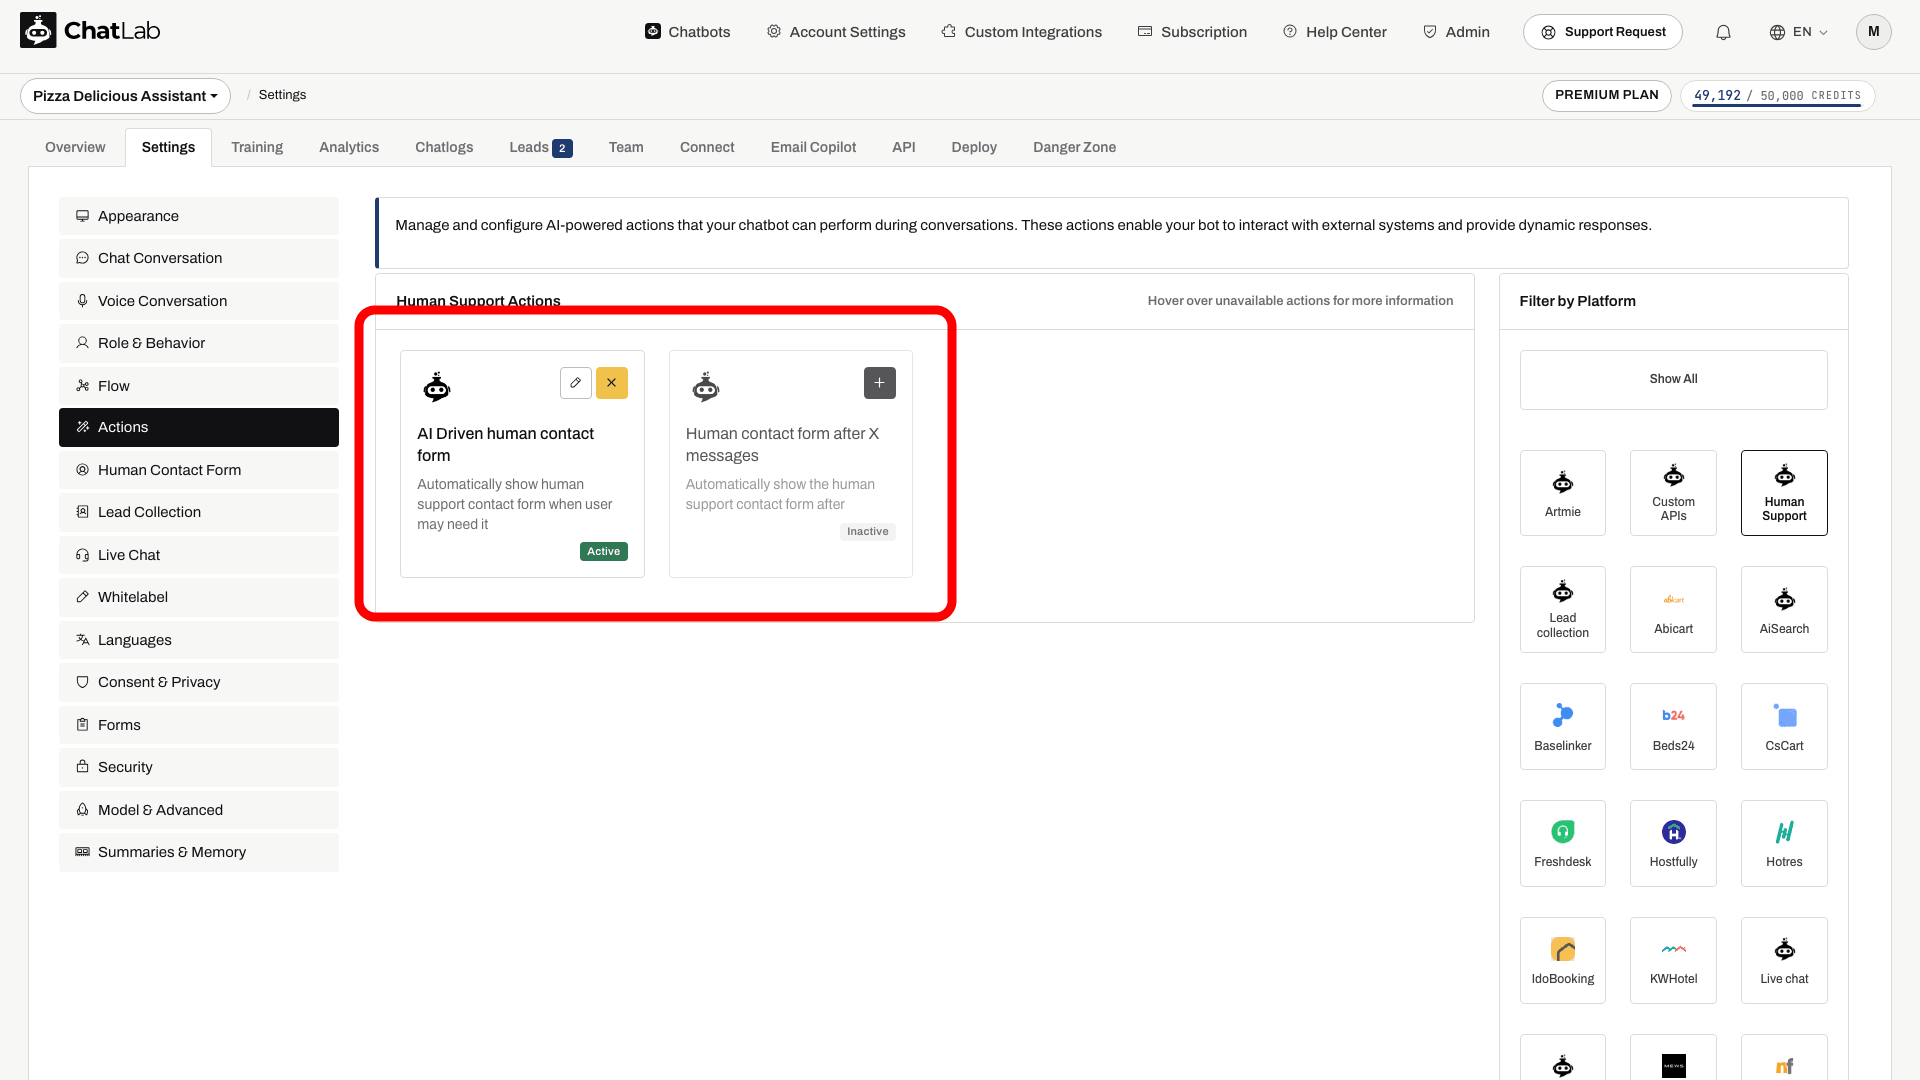
- AI Driven human contact form - uses AI to detect when the visitor needs human assistance and automatically suggests the contact form. The form also appears when the visitor explicitly asks to speak with a person.
- Human contact form after X messages - automatically displays the contact form after a specified number of messages in the conversation.
How the form looks to visitors
Leave a message for support
Enable the Human Contact Form and configure its destination. Sending a message is not a live conversation.

Visitor: I need help with a damaged item.
Play the example or read it below. No real customer data is used.The visitor requests help.
Playback pauses when this example leaves the screen. This is a simulation, not a live chat. Widget controls inside the playback are not interactive.Read the complete example
- The visitor requests help.
Visitor: I need help with a damaged item.
- The configured support action offers a form.
Assistant: Please leave your email and describe the problem.
- The form collects the support message.
The form collects the support message.
- A confirmation follows a successful submission.
Assistant: Example confirmation: your message has been received. Our team will reply by email.
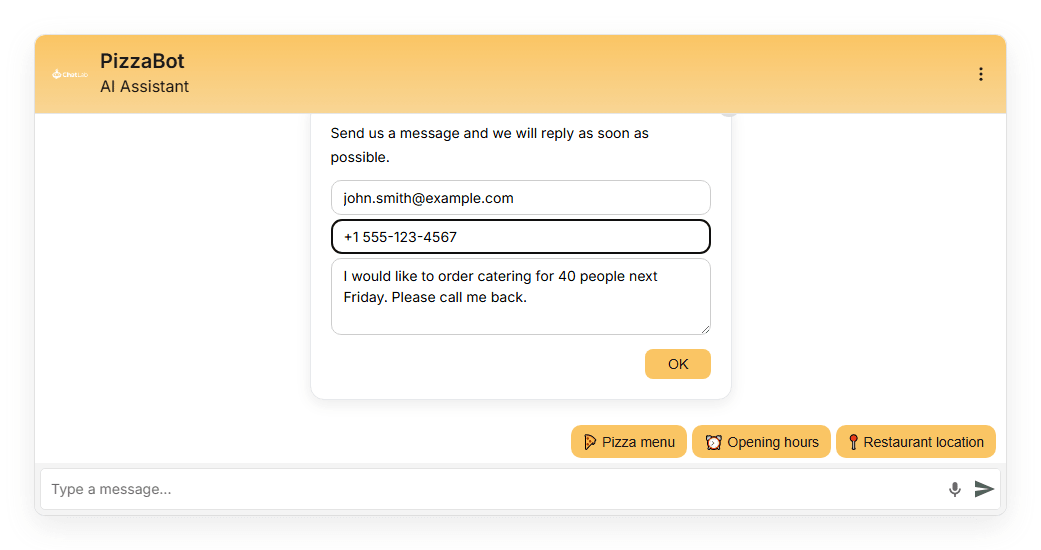
When the contact form is triggered, visitors see a form inside the chat widget with an email field, a message field, and an OK button. If privacy policy consent is required, a checkbox appears above the email field.
View the static screenshot
Translate the form
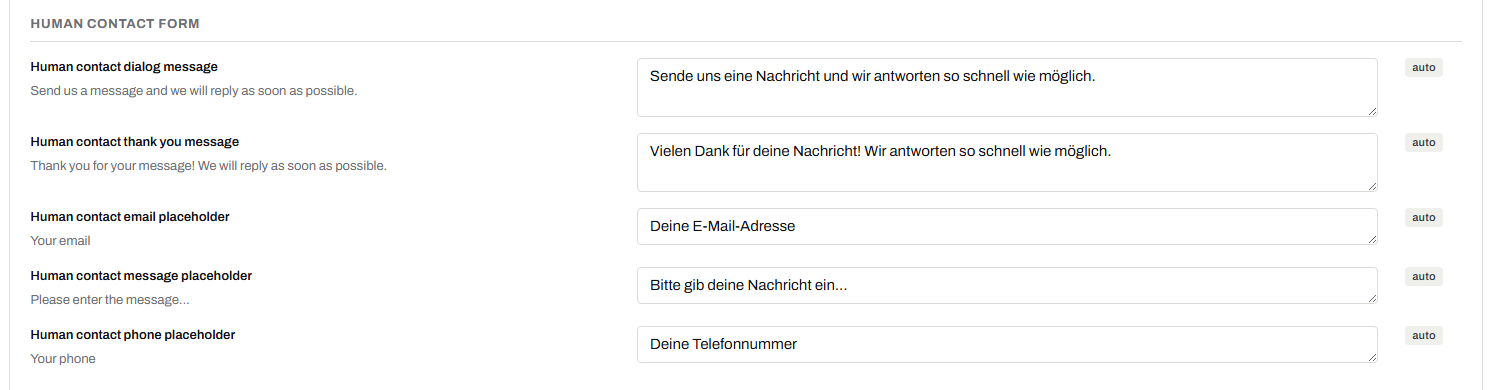
If your chatbot talks to visitors in several languages, the form texts are translated automatically - including the phone field placeholder. To review or change a translation, navigate to Settings > Languages, choose a language under Edit translations for, and find the Human contact phone placeholder row in the Human contact form group, next to the email and message placeholders. See Multilingual chatbots for how translations work.
Privacy policy consent
You can require visitors to accept a privacy policy before submitting the contact form. This is configured separately in Settings > Consent & Privacy - toggle on Require Privacy Policy consent for human support and customize the consent label with a link to your policy.
Configure the form through the API
If you manage chatbots with the Management API, the phone field is controlled by humanSupport.phoneEnabled and humanSupport.phonePlaceholder. See Management API for details.
Test the form
Open the Overview tab and use the chat tester to open the contact form. Submit a sample request with an email address you control and a phone number, check the thank-you message, and verify that the configured support mailbox receives the email. Then open Chatlogs to see the submitted form in the conversation. A custom form uses its own fields and labels; keep the support recipient and notification settings configured here.
Related articles
- Custom forms - design your own form fields to use for human support
- Live Chat - real-time conversations with human operators
- Lead collection - capturing visitor contact details automatically
- Chatlogs - review conversations and submitted forms
- Webhooks - send contact form submissions to your own systems
- Daily summary email - the daily report that lists human support requests
- Management API - configure chatbots programmatically